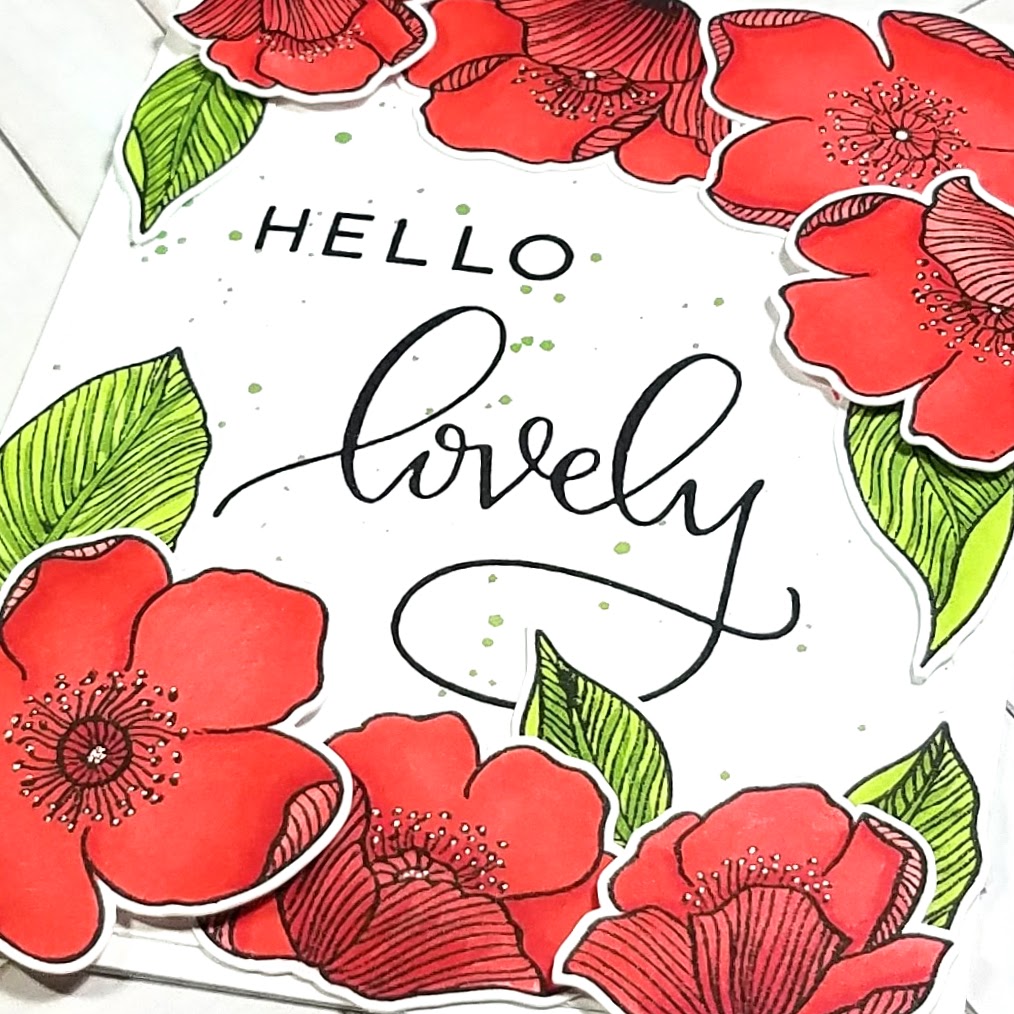
Feel Good Cards, Just Because Cards

Hello Lovely

20180416_224607.jpg

Hello, lovely!

Today’s card is my submission to the Color Throwdown Challenge as this week’s Guest Star Stamper.  I’m super excited that my card is being shared as an inspiration card for this week’s color palette, alongside some of my favorite card makers like Amy Rysavy and Barbara Anders.  How did I get to be a Guest Star Stamper?  A random number generator picked my submission to an earlier challenge :p

Today’s card uses flowers and leaves from the Altenew Adore You stamp set and a sentiment the Concord and 9th Hello Lovely stamp set.

20180415_231514.jpgI started by stamping the flowers and leaves onto Bristol Smooth Cardstock using Copic-friendly Hero Arts Intense Black ink.  Then, using Copic Sketch markers, I did some very basic blending.  I added some white detail to the centers of the flowers using a white Sakura Gelly Roll pen.  I cut out the images using a Brother ScanNCut2 and set them aside.

For the card front I cut down a piece of Neenah Solar White 80# Classic Crest cardstock with the largest die from the Lawn Fawn Outside In Stitched Rectangle die set.  I stamped the sentiment in Versafine Black Onyx Ink.  It was looking a little sparse so I smooshed some Mowed Lawn Distress Ink onto an acrylic block, added just a touch of water, and then used a small 2 round paint brush to create green splatters on the card front.

I went back to the flowers and leaves and played around until I settled on an arrangement.  Then I used a few strips of Post-It tape to temporarily hold the arrangements together so that I could easily move each arrangement around as a single piece.  I flipped each piece over and added liquid adhesive to the backs of the pieces that I wanted to sit flush against the card.  Then I flipped the piece right-side up, laid it over my card, and gently removed the Post-It Tape.  The remaining flowers are popped up using foam tape.  Finally, I adhered the entire card front to an A2-sized card base to finish off the card.

Thank you for visiting!

20180416_225008.jpg

Encouragement Cards, Feel Good Cards, Just Because Cards

You Were Born To Sparkle

20180416_220257.jpg

Hi there!

Today’s card features the new Center Cut Star background stamp from Simon Says Stamp and the Born to Sparkle stamp set from Sunny Studio.  I just love the star shape of this background!

I started using Versamark ink and Hero Arts white embossing powder to heat emboss the background onto a piece of Strathmore Bristol Smoothe paper.

For the watercoloring, I used Champagne Gold from the Gansai Tamby Starry Colors set, and a pink Arteza Real Brush Pen marker.  I used a small Pentel Aquash waterbrush, but a regular small paint brush would have worked just as well.

While the paint was drying, I stamped the sentiment in VersaMark Black Onyx ink onto a strip of vellum, sprinkled it with Hero Arts Super Fine clear embossing powder, and hit it with my heat gun.

I trimmed the card front down to 4″ x 5.25″ and then wrapped the vellum piece around it, adhering the ends of the vellum to the back side of the card front using a Tombow Mono Dots Adhesive tape runner.

Then I used liquid adhesive to adhere the card front to an A2-sized card base and that finished up today’s card.

Thanks for swinging by!

20180416_215702.jpg

Encouragement Cards, Feel Good Cards, Just Because Cards

You Are Mermazing

20180414_115432.jpg

Hello there!  I hope your week is getting off to a good start!

Today’s card is for the My Favorite Things Sketch Challenge #380.  A few days ago I pulled out some alcohol ink backgrounds that I made in late February and when I saw this weeks challenge I thought of a fishbowl and remembered that I had a blue and green background that I could use.

I started by trimming a panel of Neenah Solar White 80# Classic Crest cardstock using the largest die from the Lawn Fawn Outside In Stitched Rectangle die set.  Then I cut out the circle using the second-larged die from the My Favorite Things Inside & Out Stitched Circle die set.  I added a little bit of ink splatter using Mermaid Lagoon and Peacock Feathers Distress Inks, and then I trimmed the alcohol ink background and adhered it behind the circular window.

Then I stamped and colored one of the mermaids from the My Favorite Things Mermazing stamp set.  I used Neenah Solar White, and just did some simple Copic-marker blending.  I used E57 and E59 for her hair, E50 and E53 for her skin, R20 for her cheeks, YR15 and YR68 for the starfish, and BG11, BG45, and BG49 for her top and tail.  Then I cut her out using a Brother ScanNCut2.  I added sparkle to her top and tail using clear Wink of Stella.

For the sentiment, I prepped a piece black Recollections cardstock with an anti-static powder tool and then I stamped the sentiment in VersaMark ink.  I sprinkled Hero Arts white embossing powder over it, tapped off the excess, and then hit it with my heat gun.

I used liquid adhesive to adhere the sentiment onto the card front, and then popped up the mermaid with foam tape.  Then I adhered the entire card front to an A2-sized card base to finish.

Thanks for visiting!

20180414_115806.jpg

Animal Cards, Birthday Cards

To the Birthday Chick

20180414_222430.jpg

Hi there!

Today’s card uses the colors from Color Throwdown Challenge #488. When I saw these colors, I immediately thought of the Birthday Chicks from My Favorite Things.

I started by using Copic-friendly Hero Arts Intense Black ink to stamp the chicks, giant cupcake, and balloon onto Neenah Solar White #80 Classic Crest cardstock.  Then I got down to coloring.  I used Y15 and Y19 for the chics, B01 and B04 for the cupcakes, party hats, and candles, and YG23 and YG25 for the candles and balloon.  I used a white Sakura Gelly Roll pen to add details to the hats, cupcake frosting, candles, and balloon.  Then I cut out the images using a Brother ScanNCut2 and set them aside.

For the grass I blended Twisted Citron and Mowed Lawn Distress Inks onto an A2-sized piece of Strathmore Bristol Smooth cardstock.  Then I trimmed that piece using Lawn Fawn’s Grassy Border die.  I stamped the sentiment using the same black ink as earlier.

For the background, which is a piece of Neenah Solar White, I very lightly blended Tumbled Glass Distress Ink along the edges of the Cloud stencil from My Favorite Things.  I used the same color to lightly go around the edges of the clouds which I cut out from scrap cardstock using Lawn Fawns Simple Puffy Clouds dies.  The sun is cut from yellow Recollections cardstock using the Sunny Skies die from My Favorite Things.

I assembled the card using liquid adhesive to adhere the grass, largest cloud, chicks, and giant cupcake.  I applied the adhesive to the center of the sun, but left most of the rays unglued so that they stand up a little.  I trimmed bits of the sun rays and clouds that were hanging off the edge of the card front.

The two smaller clouds and the balloon are popped up using foam tape.  I used a Copic C1 marker to ground the chicks and giant cupcake by adding what I hope look like shadows.  And finally, I adhered the entire card front to an A2-sized card base.

Thanks for stopping by!

20180414_222423.jpg

Animal Cards, Birthday Cards

Happy Birthday

20180413_191949.jpg

Hello there!  I hope you’re weekend has gotten off to a good start!

Today’s card uses the Butterfly Beauty stamp set from Concord and 9th.  I wanted to use the detailed butterfly stamp to try a version of no-line coloring, where I wanted the outline of the butterfly to fade away but the detail of the butterfly to remain.  I wasn’t entirely successful, but it was a fun experiment and I have an idea of what to try next time!

I started by die-cutting the card front out of Ranger watercolor paper using the largest of the Wonky Stitched Rectangle die set from My Favorite Things.  Ranger watercolor paper is a nice bright white compared to other watercolor papers, and it has a rough and a smooth side (which is not uncommon, in my limited experience).  I used the smooth side for my stamping and painting.

20180413_174114.jpg
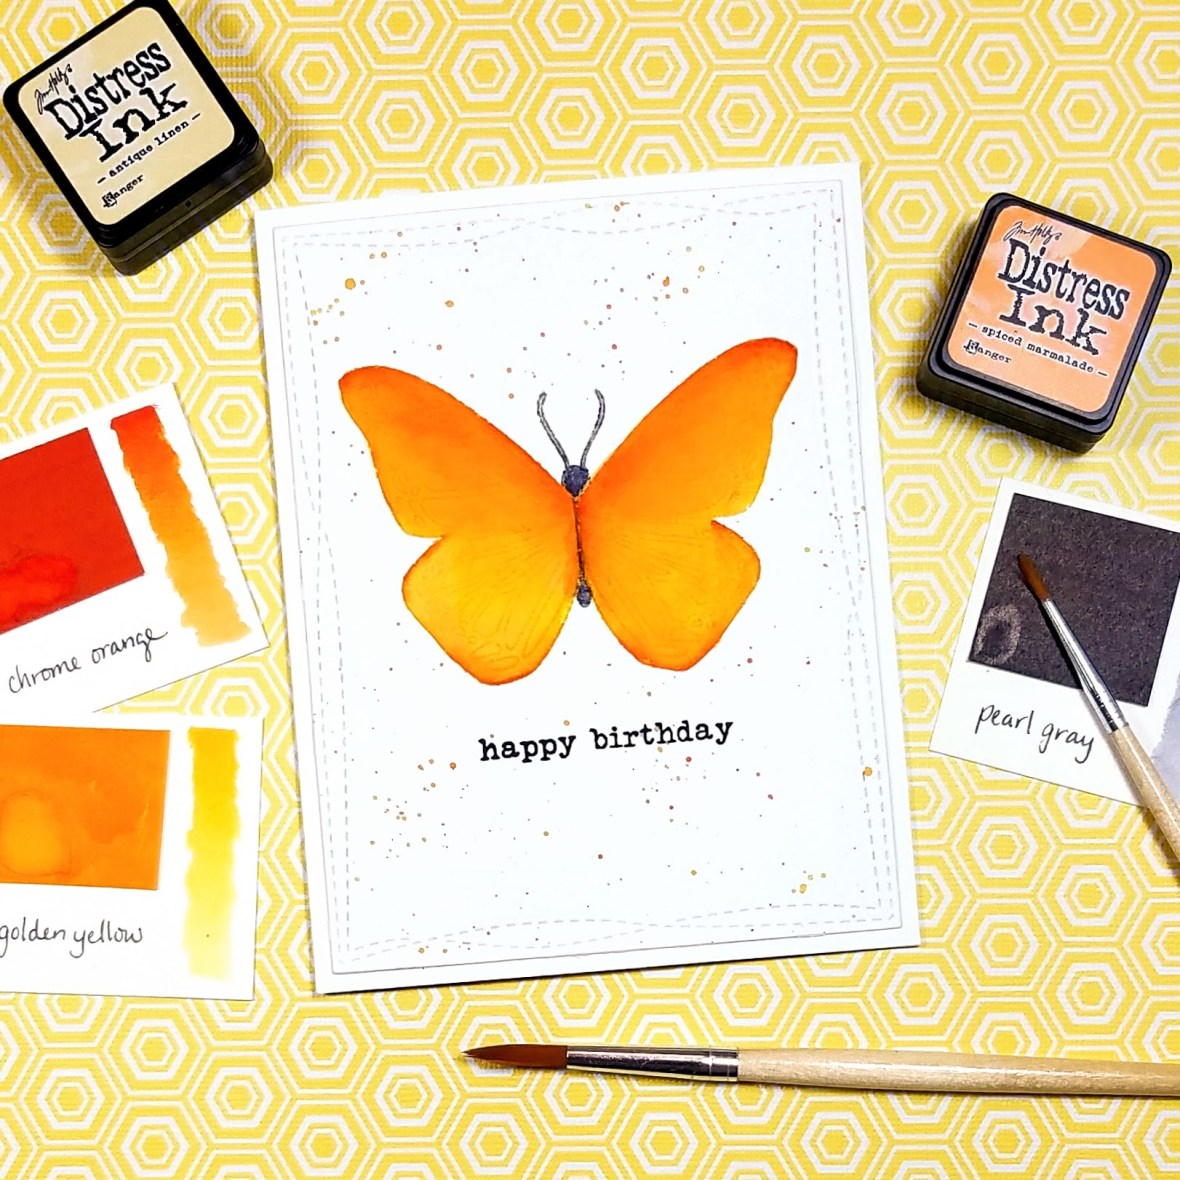
Then, I stamped the butterfly image in Antique Linen Distress Ink.  This ink color is very light and since Distress Inks react with water, I knew that the stamping could be made to fade as I added water and watercolor.

I used painter’s tape to tape down the card front to my desk and then I used an 8 round brush to apply clean clear water over the butterfly, being careful to follow the outline, and avoiding the body and antennae.  I chose Golden Yellow and Chrome Orange from Peerless Watercolors and laid down a layer of the Golden yellow with a 8 round brush.  Then I added Chrome Orange around the edges, blending inwards.  Peerless watercolors are very easy to blend and I find that I could go over areas that had dried a bit without pulling up the color.  The result is a relatively smooth layer of color.  Using a 1 round brush, I added more Chrome orange to the edges for some color variation.  Finally, I used the same brush to add Pearl Gray to the body and antennae.

20180413_182502.jpgI then decided that I wanted to add some splatter to the card, but not to the butterfly, so I created a mask by stamping the butterfly onto a piece of Judikins Eclipse Tape* that I stuck on to a piece of scrap cardstock.  Then I cut out the butterfly, peeled-off the cardstock, and masked off my watercolor butterfly.

I smooshed a bit of Carved Pumpkin Distress Ink onto an acrylic block and then, with a lightly wet brush, picked up some color and splattered it onto the card. I removed the mask and stamped the sentiment in Versafine Black Onyx ink.

Finally, I added Scor-tape to the back of the card front and adhered it to an A2-sized card base and that finished up the card.

The next time I try this, I think I may choose a very light dye ink.  While I was able to retain some of the detail of the butterfly, the veins blended away a bit too much and are harder to see where I used darker orange.

Thanks for visiting!

*Eclipse Tape is a 6″ wide roll low tack tape (it feels like Post-It tape to me).  It can be used like Stick It Adhesive Sheets or Inkadinkadoo Mask Paper, but I find it to be much more affordable since the roll contains 33 feet of tape.  It doesn’t have release paper, but I apply it to cardstock and find that it peels off cleanly.

20180413_192545.jpg