Hi there!
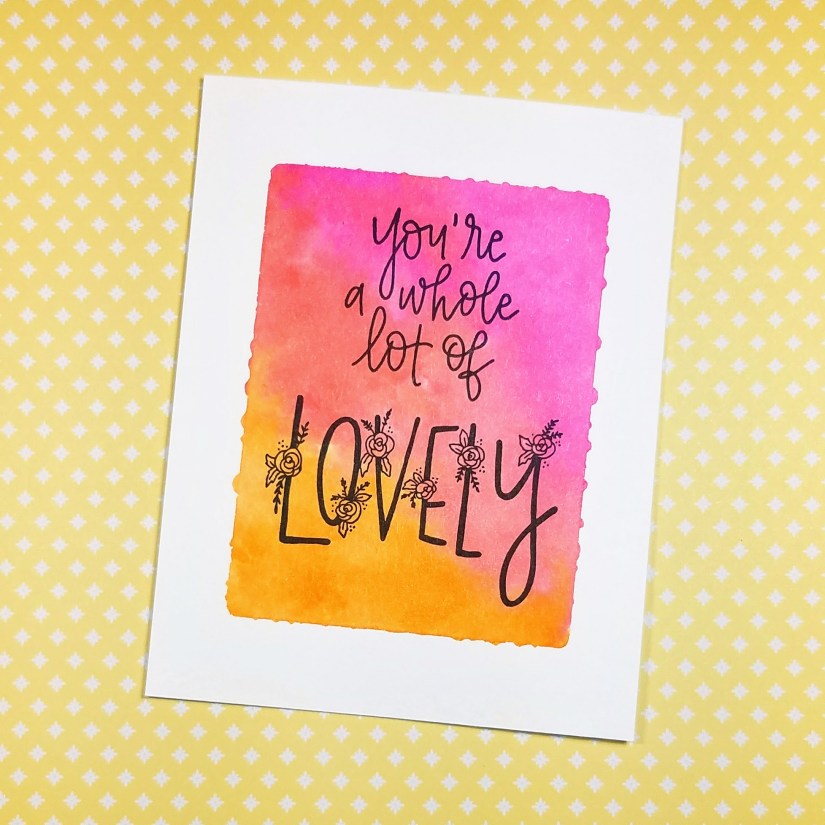
Today’s card is a quick and easy card using Concord and 9th’s Lovely stamp set and three Distress Ink colors: Picked Raspberry, Abandoned Coral, and Carved Pumpkin. Continue reading “You’re A Whole Lot Of Lovely”
Hi there!
Today’s card is a quick and easy card using Concord and 9th’s Lovely stamp set and three Distress Ink colors: Picked Raspberry, Abandoned Coral, and Carved Pumpkin. Continue reading “You’re A Whole Lot Of Lovely”

Hello there, lovely!
On Wednesdays I celebrate the fact that I’m halfway through my work week and so “Chin up buttercup” seemed like the perfect sentiment for today’s card.
This sentiment, as well as the flowers, come from The Ink Road’s Chin Up Buttercup stamp set.
The A2-sized card front is a piece of Canson XL watercolor paper. I used Daniel Smith’s New Gamboge to create this warm yellow background. There’s no special technique here, I just used an 8 round brush to add color to dry paper and created a yellow area large enough to contain the sentiment.
When the card front was dry, I stamped the sentiment in Versafine Black Onyx ink using a Misti stamping tool. Since watercolor paper is usually textured, I knew that I’d probably have to stamp the sentiment multiple times to get a crisp image so having a stamp positioning tool like the Misti came in handy.
The flowers were leftovers from a previous project, What a Lovely Face, and I thought the red/pink went well with the yellow background. I adhered the larger flowers flush to the card front, and popped up the smaller flowers using foam tape.
Finally, I adhered the card front to an A2-sized card base to finish the card.
Thank you for visiting and I hope you have a lovely day!


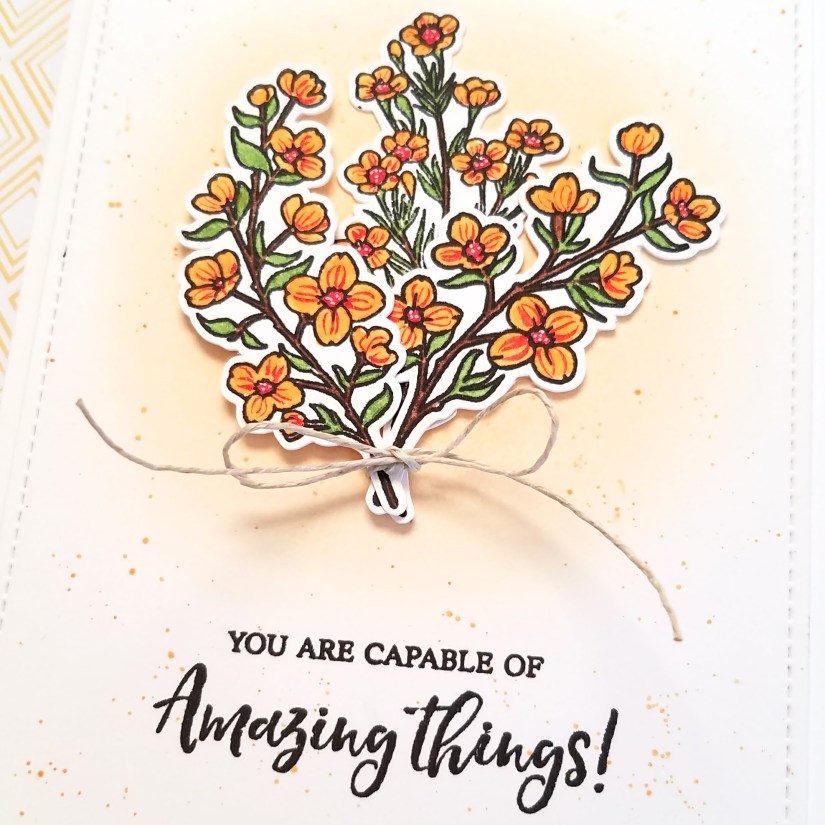
Hi there! I hope you’re having a lovely day!
Today’s card uses the Focus On You stamp set from Altenew which has a number of beautiful flowering branches.
I started by stamping three branches of flowers in Versafine Black Onyx ink onto Canson XL watercolor paper. This ink is waterproof and plays nicely with watercolors. Once the ink was dry, I added color using a few Arteza Real Brush Pens (Honey and Punch Pink for the flowers, Pea Green for the leaves, and Chocolate for the woody stems). In hindsight, I could have used any type of marker since the details in this image are so small and there’s not much opportunity for adding water or blending. I used a white Sakura Gelly Roll pen to add some very small dots to the centers of the flowers. When I finished coloring, I cut out the images using a Brother ScanNCut2 and set them aside.
The background is a piece of Strathmore Bristol Smooth which I cut down using the largest die from the Lawn Fawn Outside In Stitched Rectangle die set. Then I used a foam blending tool to softly blend Dried Marigold Distress Ink in the area that would be behind the bouquet of flowers. To add a bit of movement, I added splatter by smooshing the ink onto an acrylic block, adding a bit of water, and using a 2 round brush to flick ink onto the card front. I let the card front dry for a bit and then stamped the sentiment in the same black ink.
Then I assembled the bouquet, starting with the sprig in the middle which I adhered flat onto the card front. For the spring on the right, I added a few Zots Bling adhesive dots to the back, layering two dots on top of each other for a bit of dimension. To the spring on the left I added foam tape so that all three sprigs sit at different heights. Once all three sprigs were adhered to the paper, with their stems overlapping, I tied a bow using a piece of hemp twine. Finally, I adhered the card front to an A2-sized card base.
Thanks for stopping by!

Happy weekend!
Today I’m sharing a card using the Bouquet Builder 1 stamp set from Waffle Flower and the No Words stamp set from Neat & Tangled. Continue reading “Sending Hugs”
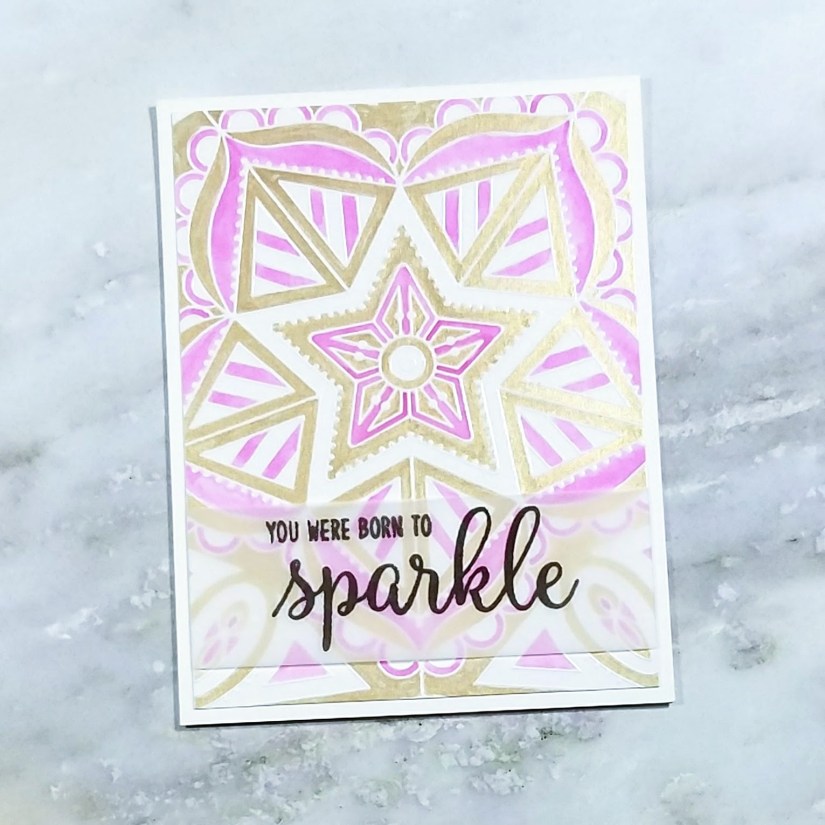
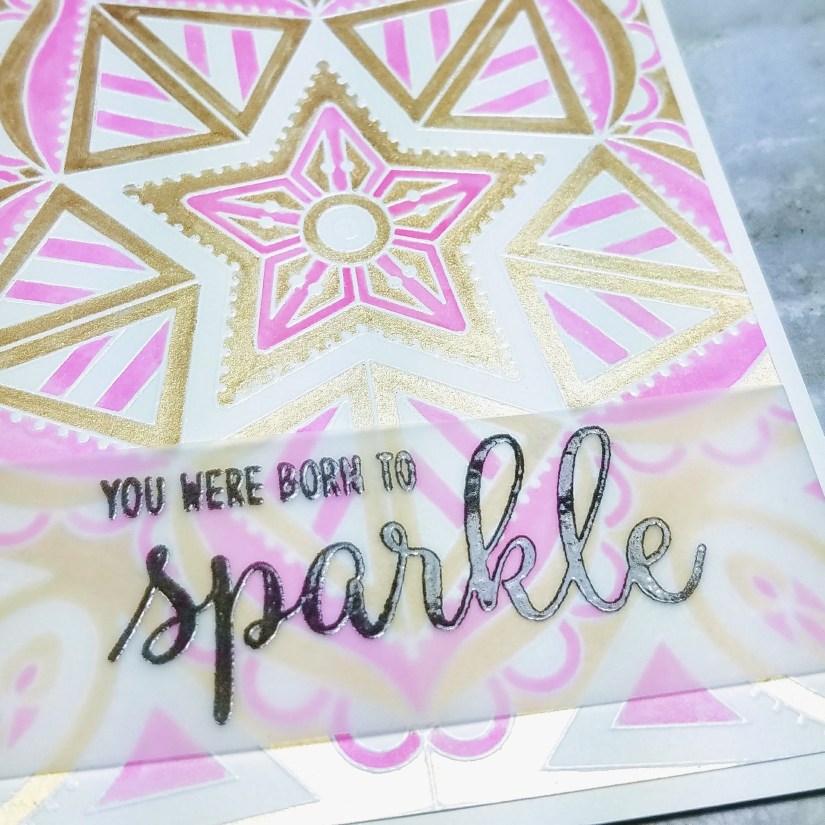
Hi there!
Today’s card features the new Center Cut Star background stamp from Simon Says Stamp and the Born to Sparkle stamp set from Sunny Studio. I just love the star shape of this background!
I started using Versamark ink and Hero Arts white embossing powder to heat emboss the background onto a piece of Strathmore Bristol Smoothe paper.
For the watercoloring, I used Champagne Gold from the Gansai Tamby Starry Colors set, and a pink Arteza Real Brush Pen marker. I used a small Pentel Aquash waterbrush, but a regular small paint brush would have worked just as well.
While the paint was drying, I stamped the sentiment in VersaMark Black Onyx ink onto a strip of vellum, sprinkled it with Hero Arts Super Fine clear embossing powder, and hit it with my heat gun.
I trimmed the card front down to 4″ x 5.25″ and then wrapped the vellum piece around it, adhering the ends of the vellum to the back side of the card front using a Tombow Mono Dots Adhesive tape runner.
Then I used liquid adhesive to adhere the card front to an A2-sized card base and that finished up today’s card.
Thanks for swinging by!