

Hello and welcome, I’m glad you’re here! Today we’re celebrating the release of the Altenew Rustic Charm Stamp/Die/Stencils/Embossing Folders/Washi Tape/Brush Marker/Fine Mister Collection (what a mouthful!)! If you arrived from Laurie Willison’s blog, you’re right on track. If you want to hop along from the beginning, visit the Altenew Card Blog. Check the bottom of this post for giveaway information and the full blog hop list.
I have four cards to share today so let’s get to it!
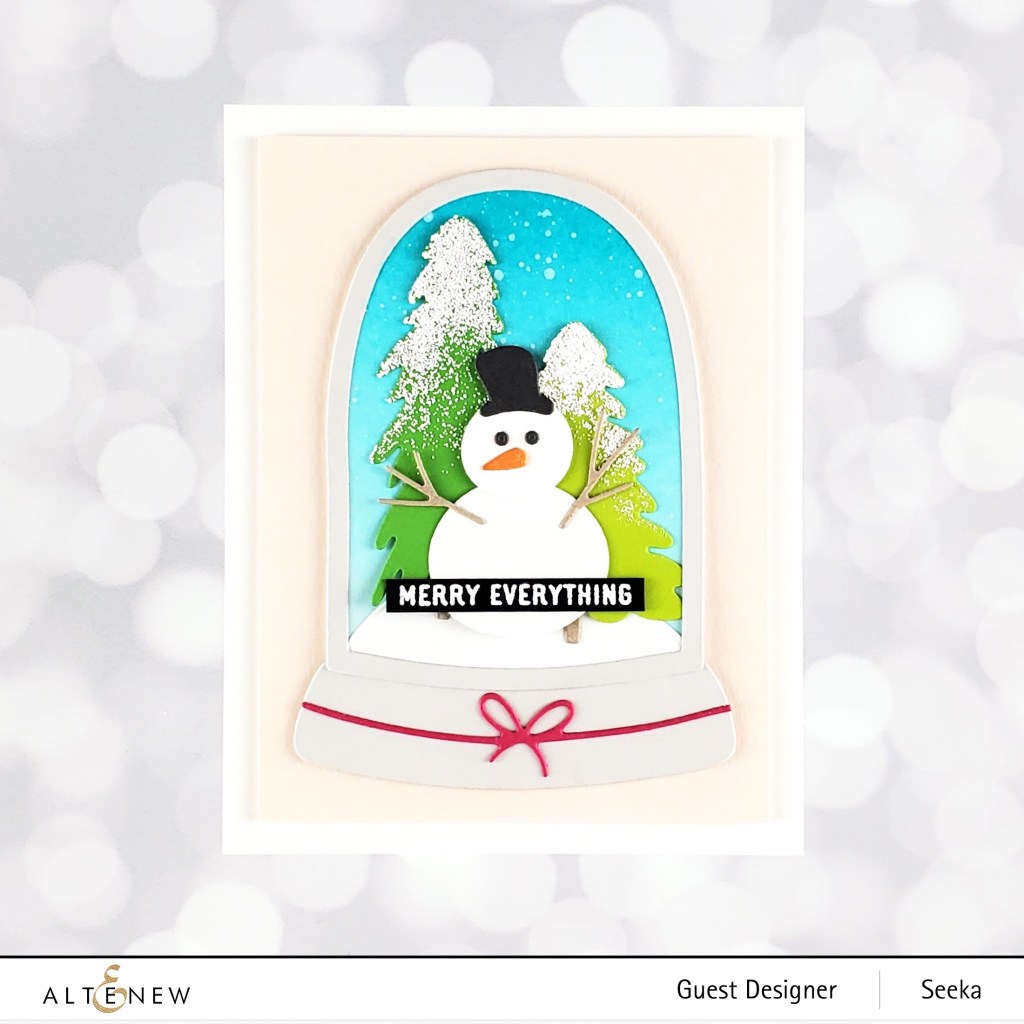
Merry Everything – Globe Builder Die Set
My first card features the Globe Builder Die Set. This set has all the parts you need to make a tall or a round snowglobe!
To recreate this card:
- Cut out all of the needed pieces from different colors of cardstock; I used Papertrey Ink Soft Stone for the base and frame, Gina K.’s Lucky Clover and Key Lime for the trees, Hero Arts Azalea for the bow and Papaya for the nose, and black, white, and kraft cardstock
- Add white embossing powder to the trees to create snow (I used Hero Arts White Puff embossing powder)
- Create a background sky by using a large blending tool to blend Aqualicious ink over a panel of white cardstock; deepen the color at the top of the panel by blending on a bit of Teal Cave ink and then splatter opaque white paint over it
- Use the tall glove background die to cut out the ink-blended sky
- Assemble and adhere all the snow globe pieces together, then adhere a heat embossed sentiment (this one is from the new All Is Bright stamp set)
- Adhere the snow globe to a 3.75″ x 5″ panel of pale pink cardstock (I used Gina K.’s Barely There)
- Use foam tape to adhere the panel to a white card base

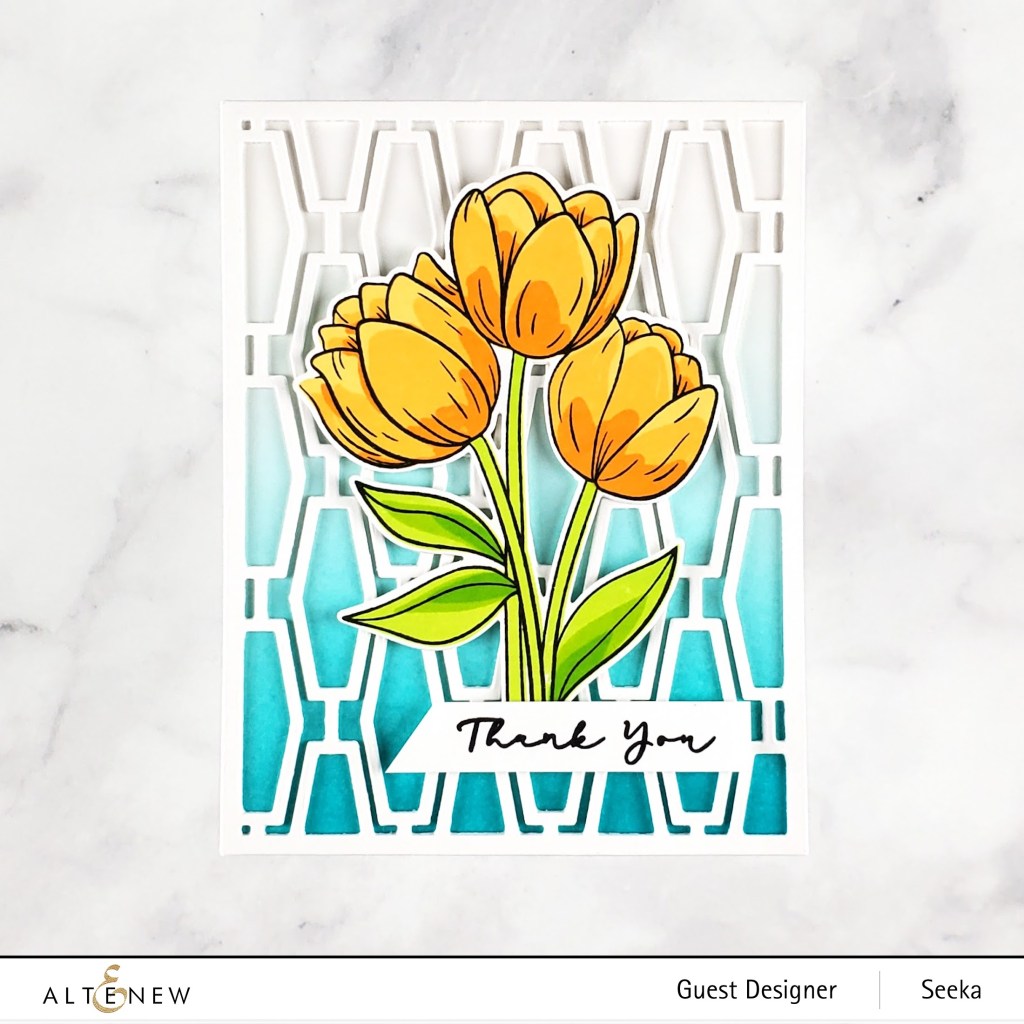
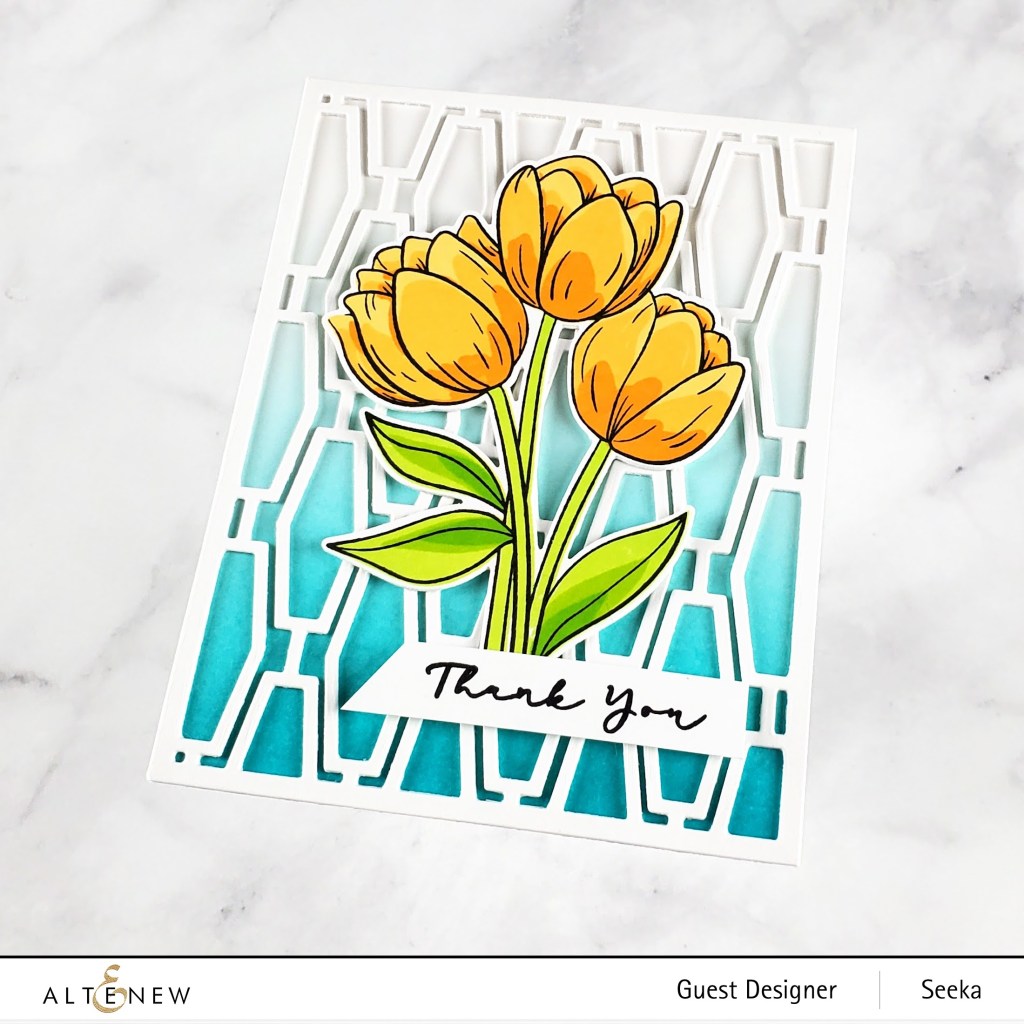
Thank You – Mid-Century Cover Die
My next card features the new Mid-Century Cover Die as a bold background to tulips I created using the Cartoon Tulips stamp set and coordinating dies (also available as a bundle).
To recreate this card:
- Stamp the outline layer of the tulip bunch in Permanent Black ink
- Stamp the three petal layers; for the yellow blooms, use Sunray, Chamomile, and Snapdragon (also available as part of a set)
- Stamp the stem and leaves layers in Bamboo, Parrot, and Grass Field
- Use the coordinating die to cut out the images; set aside
- Use the Mid-Century Cover Die to cut three pieces of white cardstock; stack and adhere the layers together to create a piece with dimension; set aside
- Use a large blending tool to blend Aqualicious ink over the bottom portion of a panel of white cardstock, letting the color fade to white towards the top; deepen the color at the bottom of the panel by blending on a bit of Teal Cave ink
- Adhere the Mid-Century piece over the ink-blended panel
- Adhere the tulips to the background and adhere a sentiment over the base of the tulips (this sentiment is from the Fresh Bloom stamp set)
- Adhere the card front to a card base
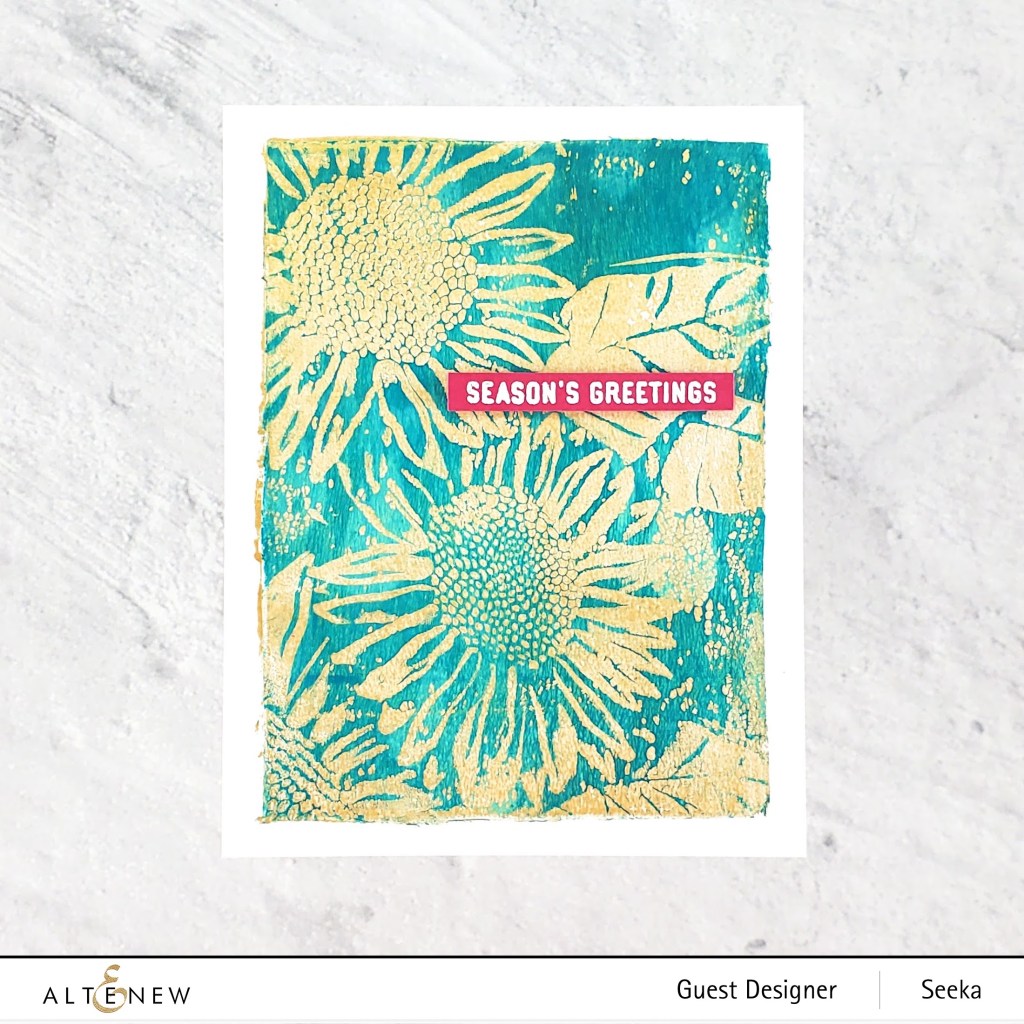
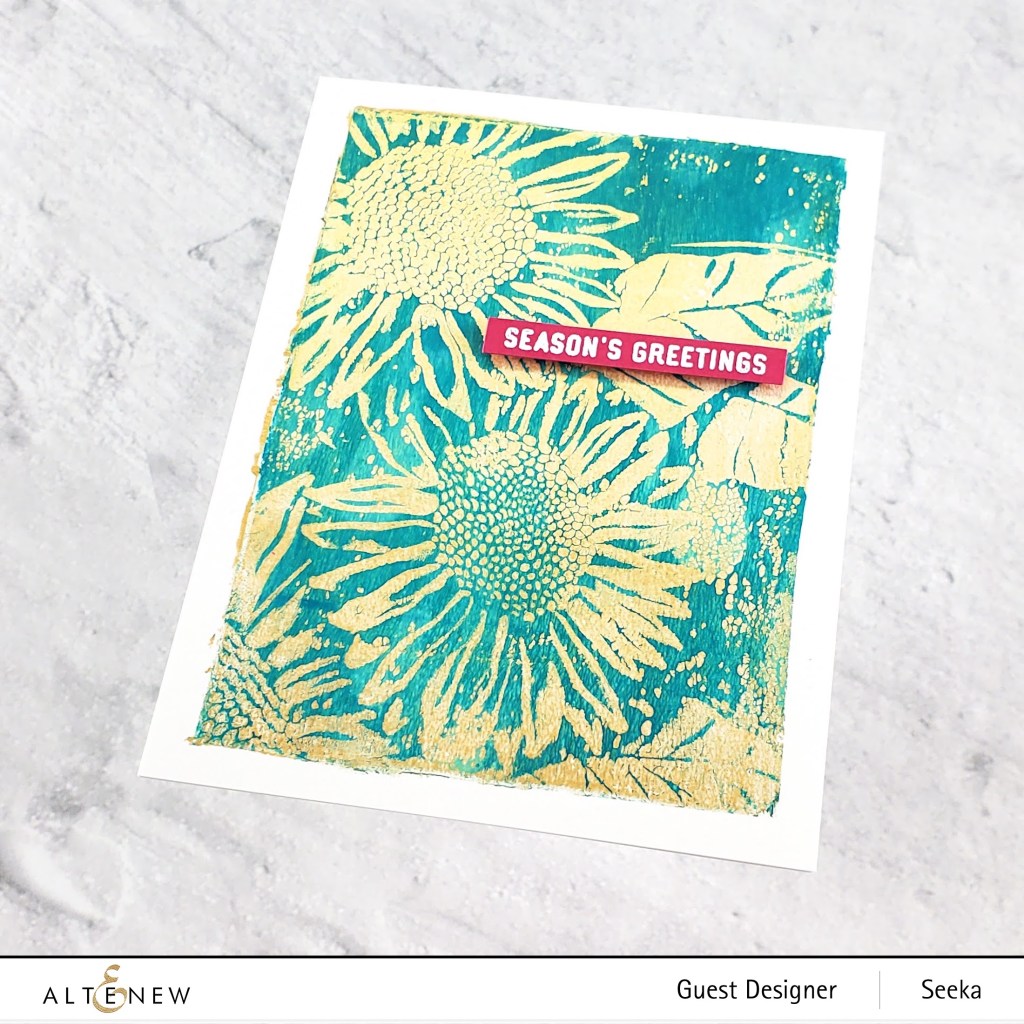
Season’s Greetings – Sunflower Bundle 3D Embossing Folder
My third card features the new Sunflower Bundle 3D Embossing Folder and a gel press technique I’ve been playing with.
To recreate this card:
- Place a piece of 80# cardstock into the embossing folder and run it through your die cut machine using the appropriate sandwich, then set the embossed panel aside.
- Prep a Gel Press gel printing plate (I used a plate that I previously cut down to about 3.75″ x 5″) by dabbing teal and blue acrylic paints (I used Dina Wakley Turquoise and Ocean) onto the plate
- Use a brayer to quickly spread the paint into a thin layer; try not to overblend if you want to maintain a bit of color variation
- Without delaying, placed the embossed panel face down (with the most textured side touching the paint) onto the Gel Press
- Use just your fingertips to gently press over the embossed flowers and leaves, making sure that those areas make contact with the Gel Press; it’s important to be gentle, the embossed panel needs only to barely touch the paint and pressing too hard flattens the embossing and picks up more paint which obscures the image
- Removed the embossed panel and set it aside; you won’t need it again
- Wait a few minutes to let the paint dry on the Gel Press
- Dab some dots of an iridescent gold acrylic paint (I used Golden Iridescent Gold Fine) onto the Gel Press and use the brayer to spread the paint into a thin layer
- Without delaying, while the gold layer is wet, place a half sheet of Neenah Solar White 80# over the plate and rub over it making sure to make complete contact with the plate
- Starting at one end, lift away the cardstock and peel it away, pulling the two layers of paint away with it
- Let the panel dry
- Heat emboss a sentiment (this one is from the Lovely Ornaments stamp set) in white embossing powder onto deep pink cardstock
- Use foam tape to adhere the sentiment to the background; then adhere the background to a card base
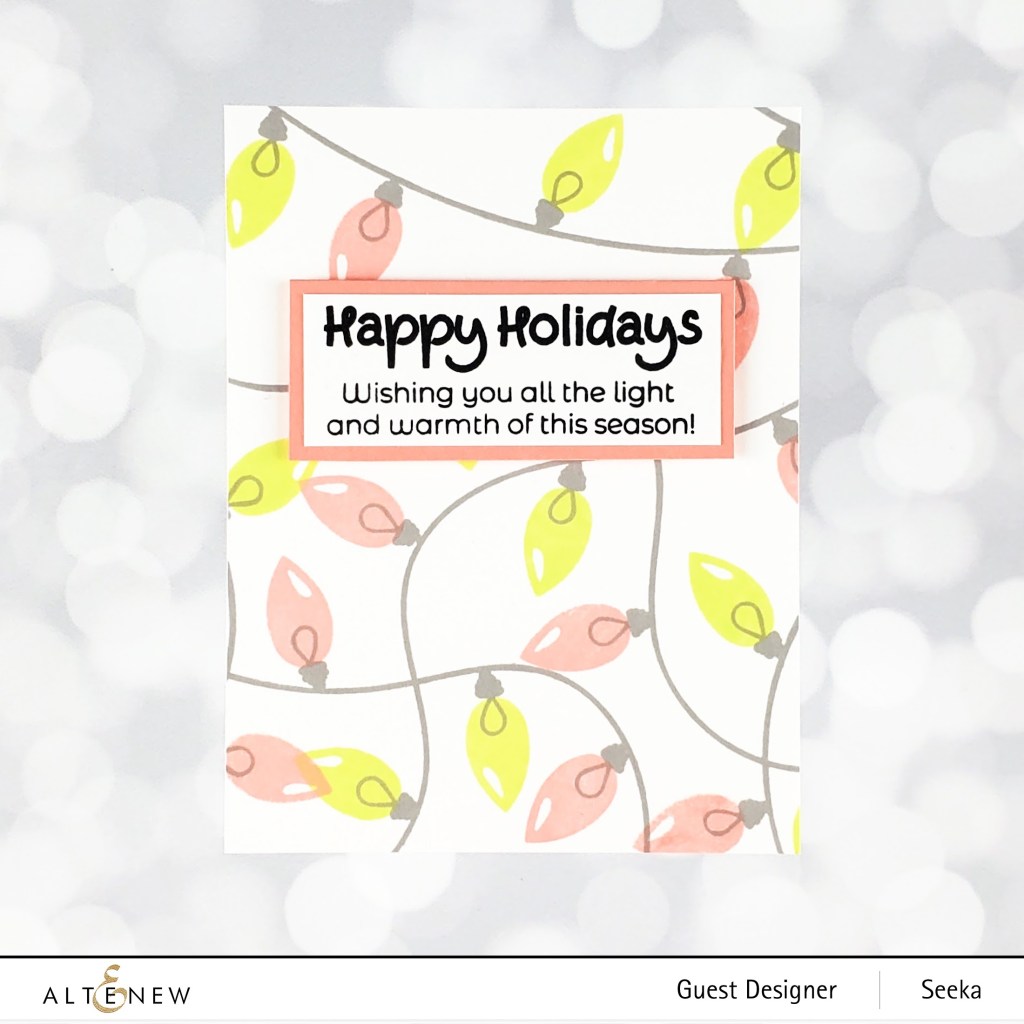
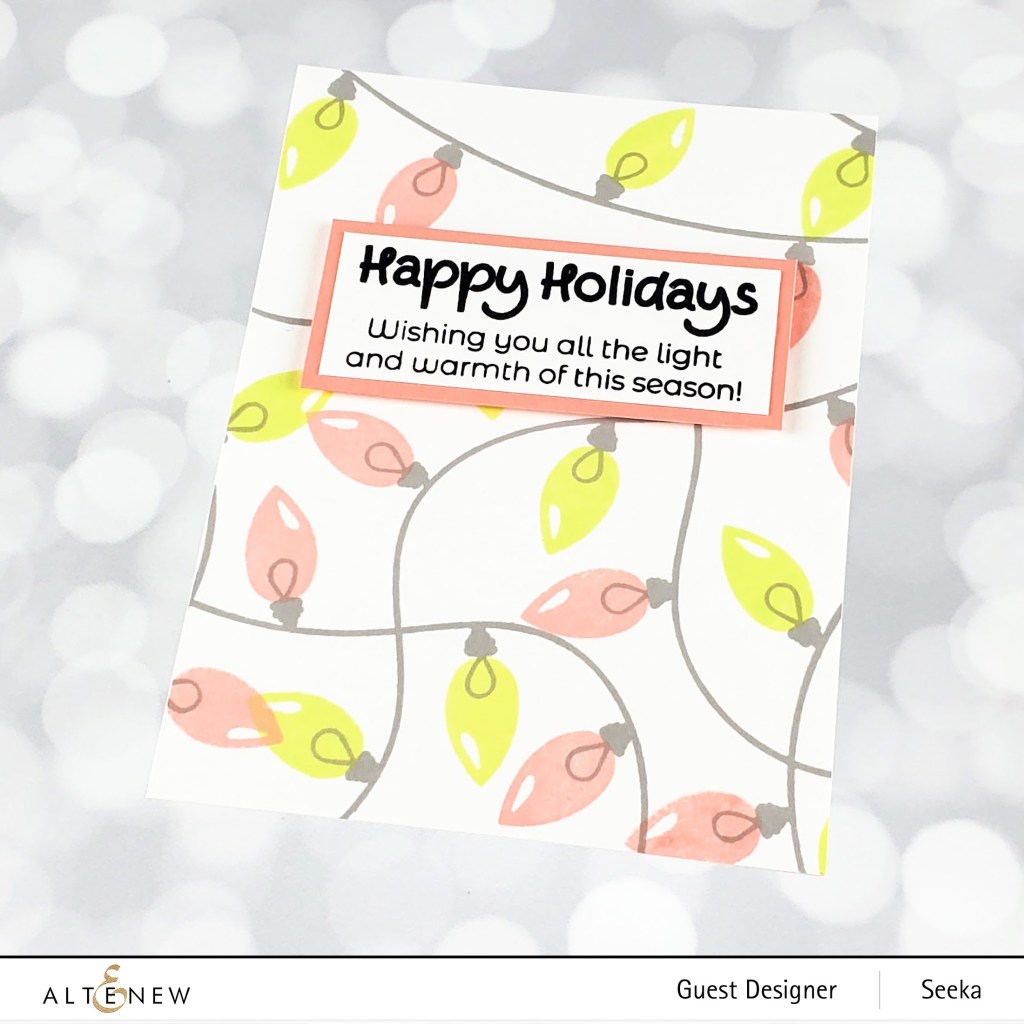
Happy Holidays – All Is Bright Stamp Set
My last card today features the All Is Bright stamp set. This fun set has four different bulb shapes that you can choose from to customize your light strands!
To recreate this card:
- Stamp the string background in Silver Lake ink onto a 4.25″ x 5″5 panel of white cardstock
- Stamp the bulbs in Limeade and Pink Pearl
- Stamp the sentiment in black pigment ink onto white cardstock; trim into a sentiment strip
- Adhere the sentiment to a slightly larger piece of pink cardstock (I used Concord & 9th’s Grapefruit)
- Use foam tape to adhere the sentiment to the background
- Adhere the card front to a card base
Thank you so much for visiting! Your next stop is the wonderful Jenny Colacicco. Be sure to check below for information about the giveaway and for the full blog hop list!
Giveaway
$300 in total prizes! To celebrate this release, Altenew is giving away a $50 gift certificate to 2 lucky winners and a $25 gift certificate to 8 winners! Please leave a comment on the Altenew Card Blog and/or each designer’s blog post on the blog hop list below by 10/11/2021 for a chance to win. Altenew will draw 10 random winners from the comments left on each stop of this blog hop and announce the winners on the Altenew Winners Page on 10/13/2021.
Blog Hop List
- Altenew Blog
- Jaycee Gaspar
- Vicky Papaioannou
- Norine Borys
- Dana Joy
- Laurie Willison
- Seeka <– You are here
- Jenny Colacicco
- Erum Tasneem
- Daniel Diaz
- Terri Koszler
- Nathalie DeSousa
- Verity Biddlecombe
- Tenia Nelson
- Therese Calvird
- Joy Baldwin
- Michelle Short
- Virginia Lu
- LauraJane
- Amanda Baldwin
- Emily Midgett
- Reiko Tsuchida
- Agnieszka Małyszek
- Nenette S. Madero
- Svitlana Shayevich
- Lilith Eeckels
- Maryam Perez
- Bridget Casey
- Tania Ahmed
- Zinia Redo
- Sandhya Iyer
- Sande Woodson
- Linda Parker
- Amy Hill
- Ishani
- Joylita Dsouza
- Natasha Davies
- Rosie Neustaedter

I can’t ever seem to get enough flowers, your thank you card using the mid century cover plate die is so beautiful!
LikeLiked by 1 person
All your cards are lovely!
LikeLiked by 1 person
Love that snowman in the globe! So cute!
LikeLiked by 1 person
Love the snowglobe one and Christmas lights!
LikeLiked by 1 person
All are great ideas!
LikeLiked by 1 person
Such beautiful cards! I love that snowman!
LikeLiked by 1 person
Your cards are wonderful.
LikeLiked by 1 person
Thanks for all the great ideas to use with this release!
LikeLiked by 1 person
Love the snow globe card. So cute!
LikeLiked by 1 person
love your color palette! Very pretty cards.
LikeLiked by 1 person
Wonderful card designs
LikeLiked by 1 person
So wonderful.
LikeLiked by 1 person
Great cards. I love that some are for the holidays and some remind me of summer!
LikeLiked by 1 person
Beautiful cards! The snow globe is so cute!
LikeLiked by 1 person
Wow you have been busy with all these cards. Wonderful job! It is so hard to tell you which one I like the best! I love the yellow flowers but I do like to see more than just flower cards. So this is an excellent release for me. I love the merry everything sentiment so I love your snow globe the best, I guess I would have to say. I love snowmen and he’s cute. Thanks for sharing your designs with us.
LikeLiked by 1 person
Great cards! I love the added snow to the top of the trees.
LikeLiked by 1 person
Such cute cards! I especially love the sunflower one. I can’t wait to try out that technique.
LikeLiked by 1 person
Love these cards. The snowman is so cute. There are so many great products in this release.
LikeLiked by 1 person
The snowman card is so cute!
LikeLiked by 1 person
Awesome cards! The Globe Builder set is a favorite! Love that adorable snowman!
LikeLiked by 1 person
OMGoodness- your mid-century tulip card is stunning ❤
LikeLiked by 1 person
I really like the way you decorated the tree tops I’m the globe. And the interesting color combination for the Christmas lights.
LikeLiked by 1 person
Lovely cards! The snowman is so cute!
LikeLiked by 1 person
Lovely inspiration pieces, love your color combos and the Sunflower Holiday card is very creative.
LikeLiked by 1 person
LOVE!!!
LikeLiked by 1 person
Wonderful variety of cards! I love the snowman!
LikeLiked by 1 person