
Hi there, I hope your week is going well!
It’s the 15th of the month and that means there’s a new challenge up over on A Blog Named Hero. This month’s theme is “A See Through Element.”

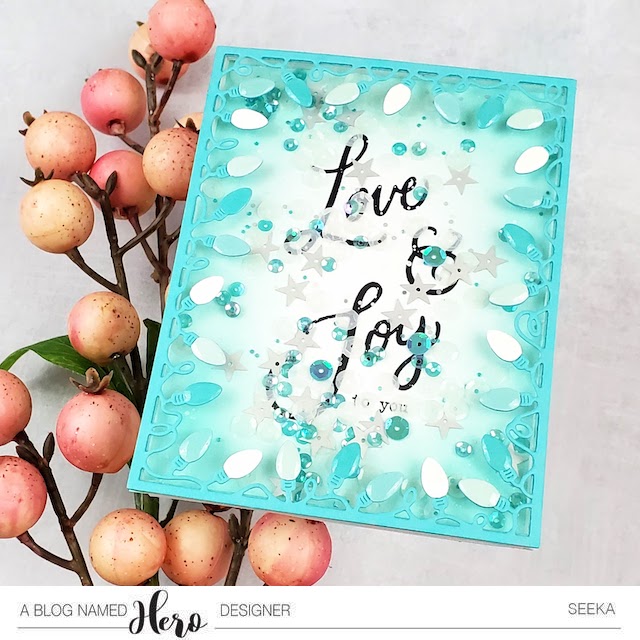
I’ll be honest, as I was putting this card together I realized that it was a bit trickier than I planned for, due to the very thin border of the die cut frame. To make it easier to create a shaker card like this, I recommend adding a thicker frame either along the outside border or along the inside border. That will give you more surface area to adhere foam tape to.
I started by using the Christmas Lights Border die to cut a piece of Paradise cardstock. I also used it to partically cut a few scraps of Dove White, Arctic, and Mist cardstock, just to have some extra lightbulbs in those colors. I trimmed the extra lightbulbs away from the frame and then adhered them over the Paradise die cut.
Next, I used liquid glue to adhere the frame to a piece of acetate. While the glue was drying, I used a blending brush to blend a bit of Pool Party Reactive ink around the edges of an A2-sized piece of Dove White cardstock. I stamped sentiments from the Peace, Love & Joy stamp set in black ink into the center of the panel and then splattered it with White Glimmer Metallic ink.
To prepare for assembling the card, I adhered a double layer of thin foam tape strips around the edge of the acetate and then I poured some Frost sequins in the center of the sentiment panel. I removed the release paper from the foam tape and then adhered the acetate panel over the sentiment panel. Then I adhered the card front to a card base.
As a finishing touch, I covered each bulb with Ranger Glossy Accents and set the card aside to dry overnight.
Thank you so much for visiting!
