Animal Cards, Birthday Cards

Happy Birthday

20180413_191949.jpg

Hello there!  I hope you’re weekend has gotten off to a good start!

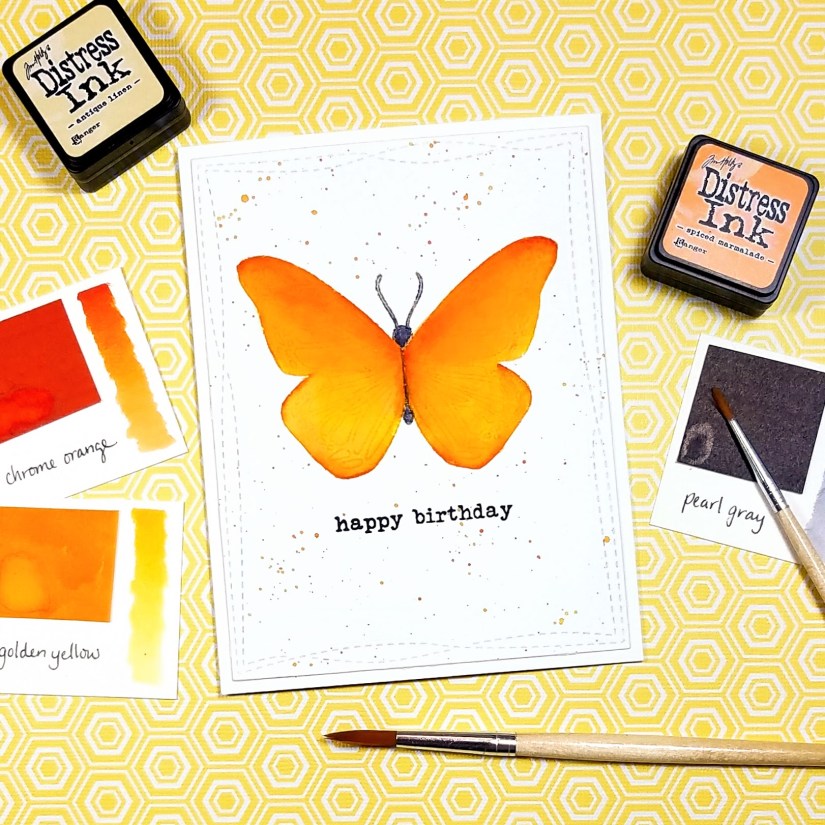
Today’s card uses the Butterfly Beauty stamp set from Concord and 9th.  I wanted to use the detailed butterfly stamp to try a version of no-line coloring, where I wanted the outline of the butterfly to fade away but the detail of the butterfly to remain.  I wasn’t entirely successful, but it was a fun experiment and I have an idea of what to try next time!

I started by die-cutting the card front out of Ranger watercolor paper using the largest of the Wonky Stitched Rectangle die set from My Favorite Things.  Ranger watercolor paper is a nice bright white compared to other watercolor papers, and it has a rough and a smooth side (which is not uncommon, in my limited experience).  I used the smooth side for my stamping and painting.

20180413_174114.jpgThen, I stamped the butterfly image in Antique Linen Distress Ink.  This ink color is very light and since Distress Inks react with water, I knew that the stamping could be made to fade as I added water and watercolor.

I used painter’s tape to tape down the card front to my desk and then I used an 8 round brush to apply clean clear water over the butterfly, being careful to follow the outline, and avoiding the body and antennae.  I chose Golden Yellow and Chrome Orange from Peerless Watercolors and laid down a layer of the Golden yellow with a 8 round brush.  Then I added Chrome Orange around the edges, blending inwards.  Peerless watercolors are very easy to blend and I find that I could go over areas that had dried a bit without pulling up the color.  The result is a relatively smooth layer of color.  Using a 1 round brush, I added more Chrome orange to the edges for some color variation.  Finally, I used the same brush to add Pearl Gray to the body and antennae.

20180413_182502.jpgI then decided that I wanted to add some splatter to the card, but not to the butterfly, so I created a mask by stamping the butterfly onto a piece of Judikins Eclipse Tape* that I stuck on to a piece of scrap cardstock.  Then I cut out the butterfly, peeled-off the cardstock, and masked off my watercolor butterfly.

I smooshed a bit of Carved Pumpkin Distress Ink onto an acrylic block and then, with a lightly wet brush, picked up some color and splattered it onto the card. I removed the mask and stamped the sentiment in Versafine Black Onyx ink.

Finally, I added Scor-tape to the back of the card front and adhered it to an A2-sized card base and that finished up the card.

The next time I try this, I think I may choose a very light dye ink.  While I was able to retain some of the detail of the butterfly, the veins blended away a bit too much and are harder to see where I used darker orange.

Thanks for visiting!

*Eclipse Tape is a 6″ wide roll low tack tape (it feels like Post-It tape to me).  It can be used like Stick It Adhesive Sheets or Inkadinkadoo Mask Paper, but I find it to be much more affordable since the roll contains 33 feet of tape.  It doesn’t have release paper, but I apply it to cardstock and find that it peels off cleanly.

20180413_192545.jpg


Feel Good Cards, Just Because Cards

Hello

20180412_205140.jpg

Hello and happy Friday! I hope you’re having a wonderful day!

Today I’m sharing a card using Mama Elephant’s Botanic Hello stamp. I love this large stamp that covers an entire card and has beautiful flowers and leaves to color.

I used the largest die of the Lawn Fawn Outside In Stitched Rectangle die set to cut down and add stitching detail to a piece of Canson XL watercolor paper. Then I stamped the combined image and sentiment in VersaMark ink. I sprinkled the card with Hero Arts white embossing powder, tapped off the excess, and then melted the embossing powder with a heat gun.

20180412_203557.jpg

For watercolors, I used colors from a Windsor & Newton Cotman watercolor set. This set is their Painting Plus (I’ve also seen it called Pocket Plus) set of 24 half-pans. It’s a great size to take on the go and in the past, I’ve prepped multiple heat-embossed card fronts using this stamp set and painted while on vacation.

The colors I used are Purple Lake for the flowers, Sap Green and Hooker’s Green Dark for the leaves, and Payne’s Gray for the sentiment. I started by simply coloring in the flowers and leaves with Purple Lake and Sap Green with a #3 round brush. I didn’t wet the watercolor paper first, so this was a wet-on-dry approach. I let it dry and then I went back in with a #2 round brush and added more Purple Lake (with less water) to the flowers to add detail, and Hooker’s Green Dark to the leaves to add veins. Then, I used Payne’s Gray to color in the Hello sentiment.

To finish the card, I used liquid glue to adhere the card front to an A2-sized piece of Recollections Grey Kraft cardstock and then in turn adhered that to an A2-sized card base.

Thanks for coming by!

20180412_205200.jpg

Encouragement Cards, Feel Good Cards

Believe In Yourself

20180411_212725.jpg

UPDATE: I submitted this card to the CASology Challenge, Week #295, and received an honorable mention.

Hi there! I don’t know about you, but I’m ready for the weekend to get here. It’s been quite a week!

Today I’m sharing a one layer card using the Simon Says Stamp Believe stamp set. I just love this scripty font!

20180411_205048.jpg

I started by using painter’s tape to tape down an A2-sized piece of Canson XL watercolor paper to an inexpensive Jack Richeson hardboard panel (any board will do, even a plastic clipboard). Using a wet 8 round brush, I transferred some Peerless Watercolor’s Robin’s Egg Blue to an acrylic block which I used as my palette. I added some extra clean clear water to lighten the color a bit as Peerless Watercolors are quite vibrant.

Then, using a clean brush, I added clean clear water to the watercolor paper in the general area where I wanted to create the wash. Since I’m still new to watercolor, and not very practiced in all of its subtleties, I have no idea if this is the best way to achieve the look I want, which is a wash that fades into nothing. I’m learning as I go, one card at a time!

I then dropped color onto the bottom left of the watercolor paper and watched it spread. I tried to tilt the board to get the watercolor moving in the right direction,, towards the top right, and when it stalled in a harsh line, I added a bit of clean clear water in its path to pull the paint forward. When I had a decent looking wash, I used my heat gun to dry the card front.

I put the dry card front into my Misti stamping tool and stamped the sentiment in Versafine Black Onyx ink. I used the Misti because watercolor paper has a bit of texture and I wanted to make sure I could re-stamp in the same place if I didn’t get a crisp image the first time. I ended up having to stamp three times to get into all of the nooks and crannies of the paper.

I usually use liquid adhesive to adhere my card fronts to card bases, but since my panel was a bit warped I wanted to use an extra strong adhesive. I used Scor-Tape double-sided tape, which really has a strong grip, and that finished up the card.

Thanks for swinging by!

20180411_213624.jpg

Easter Cards, Spring Cards

Happy Easter

20180331_135221.jpg

Happy Easter!

I pulled this card together at the last minute using the only remotely Easter-themed item in my crafting stash: Simon Says Stamp Oval of Flowers. An oval is egg-shaped, right? This pattern is also available in a die, and I purchased the set that includes the stencil and the die.

20180331_131311.jpg

To start, I lightly hand wrote the Happy Easter sentiment in pencil, erasing and adjusting until I had it properly centered. Then I went over the pencil with a Sakura Pigma Micron Pen (03, black). I let it dry before erasing the pencil.

I then used Post-It Tape to tape down the stencil onto an A-2 sized piece of Neenah Solar White 80# Classic Crest cardstock and to my work surface . This tape is less sticky than painter’s tape and won’t damage your paper when you remove it.

I used foam blending tools to blend three Distress Oxide Inks (Picked Raspberry, Wild Honey, and Squeezed Lemonade) over the stencil, taking care to blend carefully between the colors.

Then I removed the Post-It tape and stencil to reveal my flower “egg.” I used the largest die from the Lawn Fawn Outside In Stitched Rectangle Stackables set to trim the panel and add the stitching detail.

To finish, I adhered the card front to an A-2 sized piece of yellow Recollections cardstock, and then adhered the finished card front to an A-2 sized card base.

Thanks for stopping by!

20180331_135251.jpg

Friendship Cards, Thank You Cards

Thank You For Helping Me Grow

20180328_192030.jpg

I just love the look of watercolor, don’t you?  I love the soft and loose feeling of it, but I have a really hard time achieving that look.  I’m a complete amateur when it comes to watercolor. So, I like big stamps which are easy to loosely paint, like this bunch of flowers from the Fleur 1 stamp set by Pinkfresh Studio.

I started by stamping the floral image with Versafine Black Onyx ink onto Canson XL watercolor paper.  Versafine is watercolor-friendly, so I knew the ink wouldn’t bleed when I added water.  I also added a sentiment from Hero Arts.

Then I taped down the panel to a board with painter’s tape, to prevent it from warping as I painted. Using a few colors from a small set of Windsor & Newton Cotman pan watercolors, I very 20180328_192530.jpg
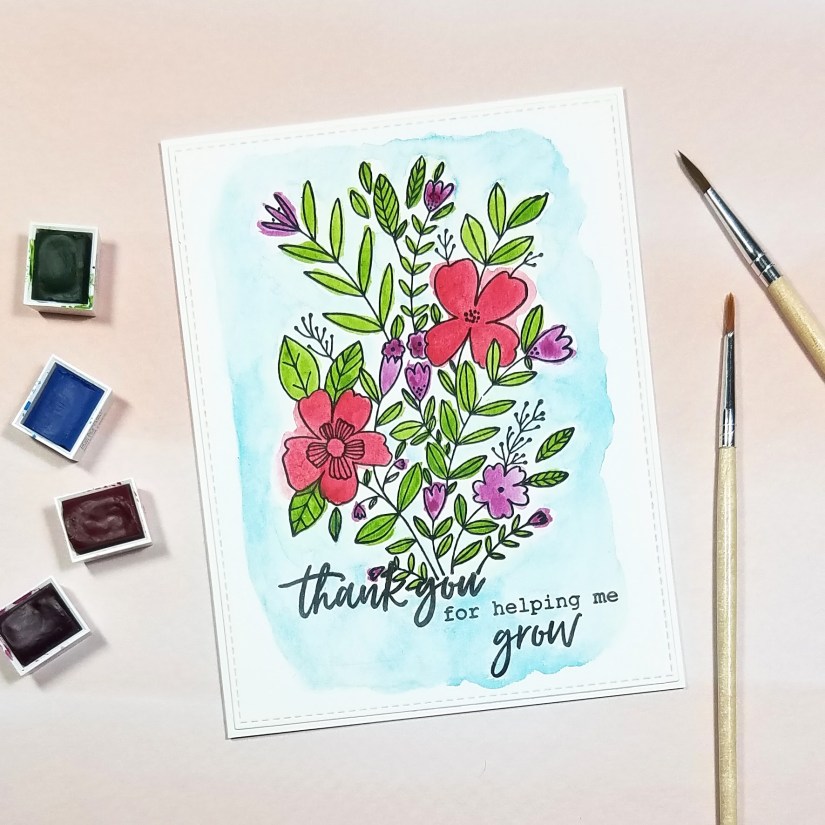
loosely painted the flowers and leaves, intentionally going outside of the lines.  If you’re like me, ignoring the lines is not easy!  I used Alizarin Red and Purple Lake for the flowers, and Sap Green for the leaves, applying the wet watercolor directly to the dry watercolor paper. Once those were dry, I wet down the area around and among the florals and dropped in a bit of watered-down Cerulean Blue.

Once everything was dry, I removed the painter’s tape and cut down the panel using a Stitched Rectangle die from My Favorite Things.  Finally, I glued the card front onto an A-2 sized card base.

The closeup photo shows just how messy it is, but I’m happy with it.

Thanks for visiting!

20180328_192459.jpg