

Hello, crafty friend! It’s release day at Hero Arts and we’re celebrating the May release with a blog hop full of inspiration and a giveaway. If you’ve arrived from Pocono Pam’s blog, you’re right on track. If you’d like to start from the beginning, head on over to the Hero Arts blog.
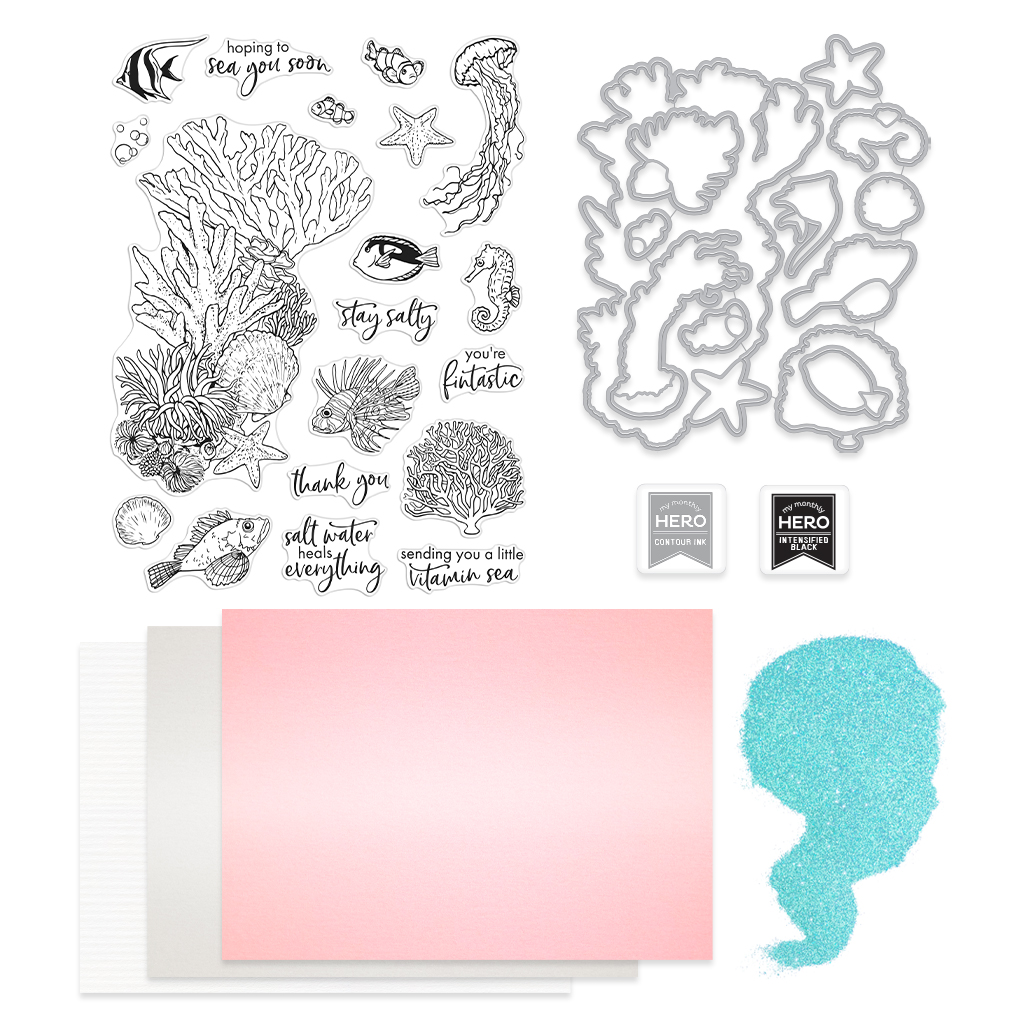
I love this month’s ocean inspired theme; it brings back memories of diving and makes me want to head to the beach! My two cards today feature images from the new My Monthly Hero kit. This month’s kit is valued at $70 but is priced at the regular $34.99 kit price. It’s a fantastic deal!
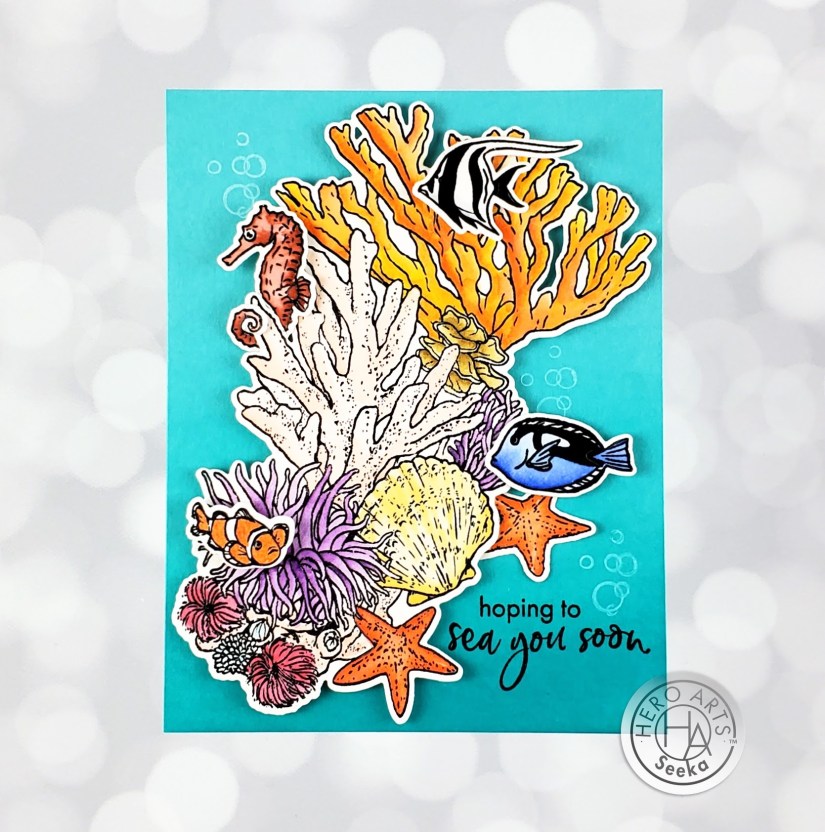
You’re Fintastic
For my first card, I stamped and colored the large coral reef once and then cut it in half to use on opposite sides of the card. Another option would have been to use one half on each of two cards for a 2-for-1! Here are the steps to recreate this card:
- Heat emboss coral reef and fish images onto Canson XL watercolor paper using Onyx pigment ink and clear Ultra Fine embossing powder
- Color in the images with watercolor markers and a Water Flow Brush filled with clean clear water (I used Karin Brushmarker Pro markers: Magenta Red, Red, Amber, Pale Orange, Gold, Lime Green, Turquoise, Royal Blue, and Plum)
- When the images are dry, use the coordinating dies to cut them out
- Use a paper trimmer to cut the coral reef image roughly in half; set all die cuts aside
- Onto a 4.25″ x 5.5″ panel of Mist cardstock, splatter white paint (I used white gouache which I watered down a bit with clean clear water)
- When the splatter is dry, smoosh a Clear Embossing & Watermark Ink pad along the bottom inch or so of the panel
- Pour Sand embossing powder over the bottom of the panel and tap off excess; then re-add a few pinches of powder to make sure that some of the darker and larger pieces of embossing powder are on the panel. Do not tap off (these larger pieces may not stick as well).
- Apply heat tool to the bottom of the panel until the embossing powder begins to melt. Continue to heat from bottom, or switch to heating from top now that the larger pieces of embossing powder are melted and won’t be blown away
- Temporarily position the die cuts to get a sense of where your sentiment should be, then stamp the sentiment in Onyx pigment ink
- Use foam tape to adhere the coral reef halves to opposite sides of the background
- Use glue, glue dots, or foam tape, for a variety of dimension, to adhere the remaining elements to the background
- Adhere the card front to a card base


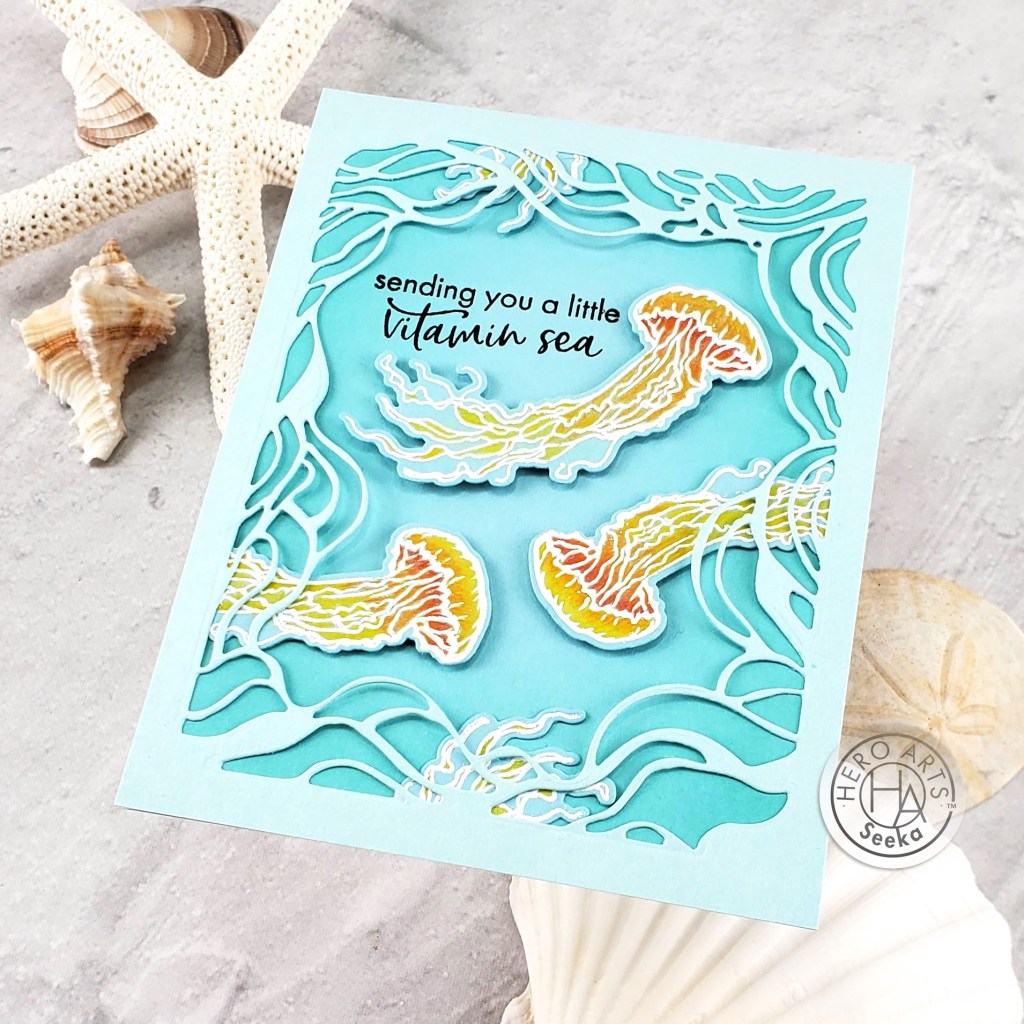
Sending You A Little Vitamin Sea
For my second card, I combined jellies from the My Monthly Hero kit with the new Swirling Tide Border Die With Frame. I love this frame die!
To recreate this card:
- Use Clear Embossing & Watermark Ink and white embossing powder to heat emboss the jellyfish three times onto Mist cardstock. Use a stamp positioning tool if possible.
- Use colored pencils to color in the jellyfish (I used yellow and orange Faber-Castell Polychromos pencils. If you used a stamp positioning tool, you can re-heat emboss the images to cover any pencil marks that strayed onto the heat embossing.
- Use the coordinating die to cut out the jellies and then set them aside
- Cut a 4.25″ x 5.5″ panel of Mist cardstock
- Use a blending brush to blend Tide Pool ink around the borders of the panel, about an inch inwards from the edge. Set the panel aside.
- Use the Swirling Tide border die, without the frame, to cut a 4.25″ x 5.5″ panel of Arctic cardstock
- Use some thin lines of glue around the border of the Swirling Tide die cut to adhere it to the panel of Mist cardstock; leave enough unglued area at the edges to be able to tuck in the jellies
- Stamp the sentiment, from the My Monthly Hero kit, in Onyx pigment ink
- Use foam tape to adhere a full jellyfish near the sentiment
- Use foam tape (do not remove release paper) just under the heads of the other two jellyfish and, after estimating their placement and how much of their tentacles overhang the side of the panel, trim the ends of their tentacles (do not discard)
- Adhere the two jellyfish to the panel, tucking their tentacles underneath the frame
- Adhere the trimmed off tentacle ends underneath the frame at the top and the bottom of the cardfront
- Adhere the card front to a card base
Thanks so much for visiting! Your next stop is the lovely Jennifer Kotas. Be sure to scroll down for a photo of the card I shared during the countdown, as well as for information about the giveaway and the full blog hop list.

Giveaway
Hero Arts will give away one $50 gift card, drawn from the comments left across the hop. Enter by Sunday, May 9th at 11:59 PM Pacific time, and the winner will be announced on the Hero Arts blog the following week.
Blog Hop List
Hero Arts
Channin Pelletier
Dana Joy
Daniel West
Debi Adams
Emily Midgett
Ilina Crouse
Jessica Frost-Ballas
Libby Hickson
Lydia Fiedler
Maria Willis
Michelle Short
Mindy Eggen
Pocono Pam
Seeka <– You are here
Special Guests:
Jennifer Kotas
Jennifer Shurkus
Nichol Spohr
Rebecca Keppel
And visit on Instagram:
BreAnn Loveland
Kailash Naidoo

Beautiful cards! I wish I could get this entire release.
LikeLiked by 1 person
All these are nicely done I like the add-on you used with the jelly fish. Thanks this is such a great release.
LikeLiked by 1 person
All so vibrant and vivid!! Great inspirations!
LikeLiked by 1 person
My weakness is jellyfish! Loved your jellyfish card!
LikeLiked by 1 person
The variety of colors makes this set so versatile, love the cards! Fin-tastic!
LikeLiked by 1 person
awe such beautiful cards love these!!
LikeLiked by 1 person
All the cards give me a Finding Nemo feel and I just “keep swimming” in awe of this kit!
LikeLiked by 1 person
Beautiful cards—the jellyfish card is so fun!!
LikeLiked by 1 person
Gorgeous! Love your colors!
LikeLiked by 1 person
So colorful! love all 3 cards!
LikeLiked by 1 person
Gorgeous! The backgrounds are equally stunning as the focal images. Outstanding MMH kit!
LikeLiked by 1 person
So beautiful!
LikeLiked by 1 person
These are all so gorgeous. I love the jellyfish, and all of the corals and other creatures…..gorgeous!
LikeLiked by 1 person
Like the colors, dimension, sand embossing and more for the scenes. May have to add some more add-ons to my order.
Melissa
“Sunshine HoneyBee”
LikeLiked by 1 person
All super gorgeous cards!
LikeLiked by 1 person
Great ocean scenes. I really like the sand powder.
LikeLiked by 1 person
Hey there, Seeka – Love the choices of color on your cards. They are just beautiful – very calming. I feel like I am looking in an aquarium!
Lori S in PA
LikeLiked by 1 person
Love your cards! Great colors and depth!
LikeLiked by 1 person
Beautiful coloring! I LOVE these scenes!
LikeLiked by 1 person
I love your Jellyfish card! So pretty
LikeLiked by 1 person
I like the die cut in half. I plan to copy that idea for my card.
LikeLiked by 1 person
I love your cards! Thanks for sharing.
LikeLiked by 1 person
Beautiful cards! The sand embossing powder looks great.
LikeLiked by 1 person
Wow! Beautiful designs! I love the jellyfish card!
LikeLiked by 1 person
Thank you for the detailed instructions for your gorgeous cards. Very smart use of the cut off tentacles of the jellyfish. I can’t say enough about the the beautiful colors you used. Great job!
LikeLiked by 1 person
Beautiful underwater scenes! Love your awesome coloring!
LikeLiked by 1 person
I love your jellyfish card.
LikeLiked by 1 person
Love your cards. They looks so realistic!
LikeLiked by 1 person
Wow! Lovely colors and designs. Great added texture with the sand embossing powder!
LikeLiked by 1 person