


Hello and happy Monday!
Today, we’re celebrating the Altenew Whimsical Wonder Stamps/Dies/Stencils/Embossing Folders Collection Release! If you arrived from Sandhya Iyer’s blog, you’re right on track. If you want to hop along from the beginning, visit the Altenew Card Blog. Check the bottom of this post for giveaway information and the full blog hop list.
I have five cards to share today so I’ll dive right in with quick steps to recreate each card!

Hello – Folk Art
My first card today, bold and graphic, features the new Folk Art stamp set and coordinating die (also available as a bundle). I really love this image for the way it shines as a quickly stamped image and for its coloring possibilities!
To recreate this card:
- Stamp the image in Permanent Black Crisp Dye ink onto white cardstock
- Die cut the image using the coordinating die and cut three more pieces of white cardstock with the same die
- To create dimension, stack and adhere the four pieces together with the stamped die cut image on top, then set aside
- Use Post-it Tape to mask the borders of an 4.25″ x 5.5″ panel of white cardstock
- Use a large blending tool to blend Midnight Violet Crisp Dye ink onto the panel, concentrating the color at the bottom left and letting the color fade out as you move to the top right
- Remove the masking tape
- Add adhesive to the back of the die cut piece and adhere to background, placing something heavy on top until the glue is dry
- Stamp the sentiment, from the same stamp set, in Permanent Black Crisp Dye ink onto white cardstock and trim
- Cut a piece of black cardstock the same width as the sentiment piece, and just a bit taller
- Adhere the sentiment piece to the black cardstock, aligning the tops of the pieces
- Adhere the sentiment to the card front
- Adhere the card front to an A2-sized card base


Hello – Meadow Bush
My second card features the beautiful new Meadow Bush layering stencil set and coordinating die (also available as a bundle). To recreate this soft floral card:
- Use low-tack tape to temporarily hold the stencil with the leaves to a piece of white cardstock
- Use a large or small blending tool to blend Icy Waters Crisp Dye Ink through the stencil and onto the cardstock
- Remove the stencil, position the next layer of the image, and blend with the next color until you’ve created the layered blooms with the following ink colors, light to dark: Pastel Sunrise, Canyon Clay, Burnt Red, and Icy Waters (the same color used for the leaves)
- Use the coordinating die to cut out the image and set aside
- Use Post-it Tape to mask the borders of an 4.25″ x 5.5″ panel of white cardstock
- Use a large blending tool to blend Icy Waters onto the top left of the panel, and then add Polar Bear ink as you blend towards the bottom right, letting the color completely fade out
- Stamp the sentiment, from the Vintage Garden Stamp set, in Permanent Black Crisp Dye ink while using the mask to help position the stamp
- Remove the mask
- Adhere the die cut piece using foam tape
- Adhere the card front to an A2-sized card base


Hello – Scalloped Ornaments
This card features the gorgeous outline stamps in the Scalloped Ornaments stamp set (with coordinating dies and available as a bundle). To recreate this card:
- Use brass embossing powder and embossing ink to heat emboss the outline images multiple times onto plum cardstock (here I used Hero Arts Plum cardstock and Hero Arts Brass embossing powder)
- Die cut the images and back with foam tape
- Adhere the die cut pieces to an 4.25″ x 5.5″ panel of the same color cardstock, trimming off any pieces that extend past the panel’s borders
- Use the same embossing powder and embossing ink to heat emboss the sentiment, from the Folk Art stamp set
- Back the sentiment with foam tape and adhere to the card front
- Adhere the card front to an A2-sized card base


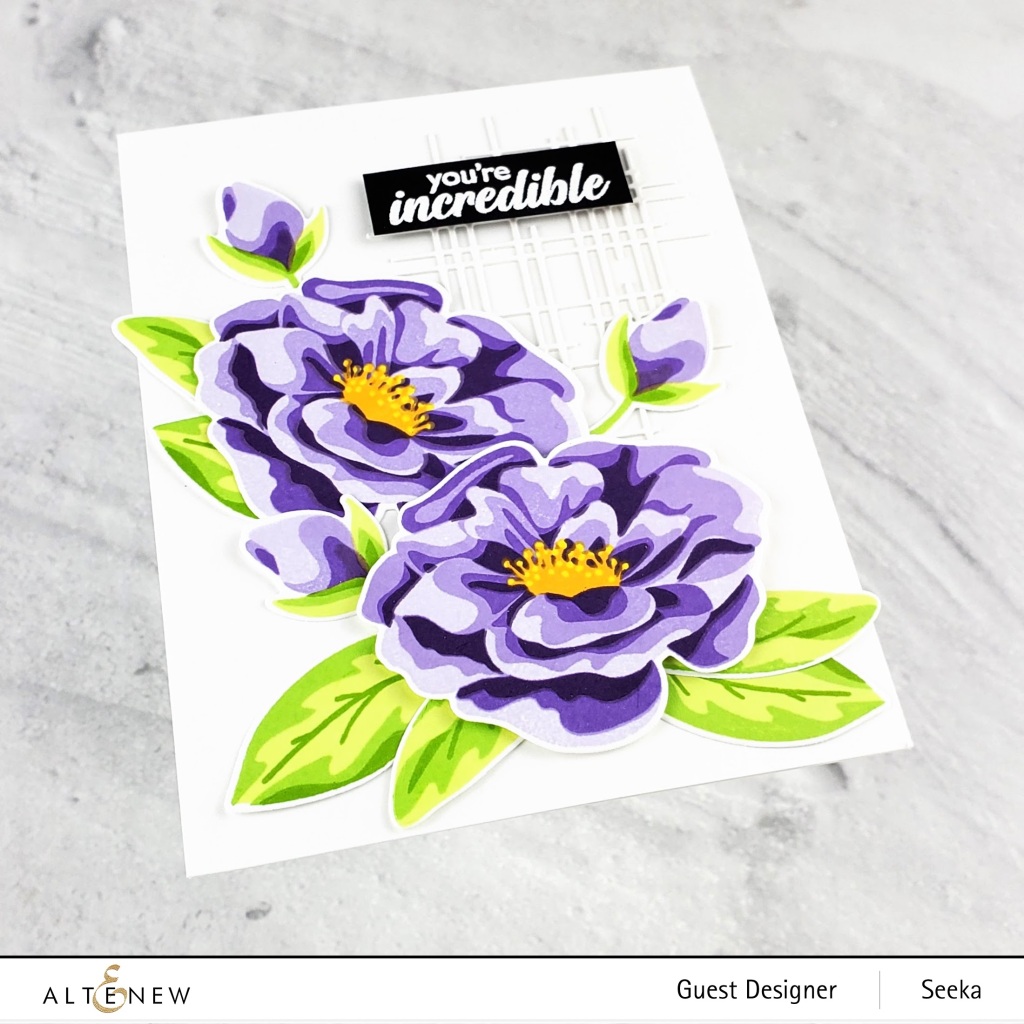
You’re Incredible – Marbled Bloom
This card features the gorgeous Marbled Bloom layering stamp set and coordinating dies (also available as a bundle). I love how bold these blooms are!
To recreate this card:
- Stamp the four layers of the blooms in Wisteria, Hydrangea, Ultraviolet, and Andromeda inks (also available as a set of ink cubes or full-size ink pads) onto white cardstock
- Stamp the three layers of the leaves in Limeade, Lime, and Fresh Leaf inks onto white cardstock
- Use the coordinating dies to cut out all of the images and set them aside
- Use the Linear Crossroads die to cut a piece of white cardstock and set the piece aside
- Use white embossing powder to emboss the sentiment onto black cardstock, then trim
- Adhere the Linear Crossroads die cut towards the top right of a 4.25″ x 5.5″ panel of white cardstock
- Adhere the leaves and blooms with a combination of glue, glue dots, and foam tape for varied dimension
- Adhere the sentiment with foam tape
- Adhere the card front to an A2-sized card base

Thank You For Being The Reason I Smile – Folk Art
My last card again features the Folk Art stamp set. To recreate this ink-blended card:
- Use foam blending tools to blend Twisted Citron, Cracked Pistachio, and Peacock Feathers Distress Oxide inks onto a 4.25″ x 5.5″ panel of Bristol Smooth cardstock
- Let the panel dry thoroughly (I tend to just leave Oxide panels overnight)
- Use embossing ink and white embossing powder to heat emboss the Folk Art image onto the panel
- Use the same ink and powder to heat emboss the sentiment onto black cardstock
- Adhere the sentiment to the background with foam tape
- Adhere the card front to an A2-sized card base
THANK YOU so much for sticking with me through all of these cards! Your next stop in the hop is Teresa Litchfield, and be sure to read below for information about the giveaway and for the full blog hop list.

Giveaway
$300 in total prizes! To celebrate this release, Altenew is giving away a $100 gift certificate to 1 lucky winner and a $25 gift certificate to 8 winners! Please leave a comment on the Altenew Card Blog and/or each designer’s blog post on the blog hop list below by 04/11/2021 for a chance to win.
Altenew will draw 9 random winners from the comments left on each stop of this blog hop and announce the winners on the Altenew Winners Page on 04/13/2021.
Blog Hop List
- Altenew Card Blog
- Nicole Watt
- Jaycee Gaspar
- Norine Borys
- LauraJane
- Emily Midgett
- Verity Biddlecombe
- Nathalie DeSousa
- Amanda Baldwin
- Laurie Willison
- Terri Koszler
- Amber Rain Davis
- Dana Joy
- Kymona Tracey
- Svitlana Shayevich
- Michelle Short
- Maryam Perez
- Simon Hurley
- Tania Ahmed
- Zinia Redo
- Therese Calvird
- Virginia Lu
- Tenia Nelson
- Lilith Eeckels
- Reiko Tsuchida
- Ardyth Percy-Robb
- Carol Hintermeier
- Jenny Colacicco
- Joylita Dsouza
- Keren Baker
- Sandhya Iyer
- Seeka <– You are here
- Teresa Litchfield
- Tricia Schaden
- Yoonsun Hur

LOVE them all, the last 2 are my favorite. Beautifully done
LikeLiked by 1 person
Thanks for the amazing inspiration. The cards are really gorgeous! The last one is my favorite.
LikeLiked by 1 person
Lovely cards! That Marbled Bloom card using the purples is a real stunner!!
LikeLiked by 1 person
These are amazing! I LOVE the purple flowers! SO VIVID!
LikeLiked by 1 person
Seeka, your ink blending behind the folk art image highlighted it beautifully. The brass embossing on the ornaments card with plum is one of my favorites on the hop.
LikeLiked by 1 person
So beautiful!
LikeLiked by 1 person
Gorgeous cards! I love Folk Art and the coordinating die! The Meadow Bush stencil set is so awesome… love those pretty blooms and the layers. Thank you for the inspirations!
LikeLiked by 1 person
So many Beautiful cards!!!!
LikeLiked by 1 person
Wow, what a gorgeous collection of cards, I love them all!
LikeLiked by 1 person
Colorful and pretty creations! Loving this new Altenew release!
LikeLiked by 1 person
The Hello card is extra pretty. WOW
LikeLiked by 1 person
Lovely cards! The one using the Meadow Bush stencil is my favorite and I need that stencil, but I really think you did an outstanding job showing off this new release.
LikeLiked by 1 person
All cards are beautiful and my favorite is the Scalloped Ornaments card. Just stunning. Thanks for sharing.
LikeLiked by 1 person
Lovely card projects! Thank you so much for sharing.
LikeLiked by 1 person
Love the plum and brass Scalloped Ornament card. It could be fabric!
LikeLiked by 1 person
These are beautiful! I really love some of your different backgrounds!
LikeLiked by 1 person
Gorgeous cards! Love your beautiful color combos with these pretty designs!
LikeLiked by 1 person
Love all the different colors! Pretty cards!
LikeLiked by 1 person
beautiful cards – so varied and inspiring
LikeLiked by 1 person
Such lovely cards! I love the florals, and the colors you used are perfect for showing them off!
LikeLiked by 1 person
I just adore all of the color schemes you used in your blended ink backgrounds! Vibrant and so full of life!
LikeLiked by 1 person
Beautiful cards! I really love the marbled bloom – such beautiful colours!
LikeLiked by 1 person
You’ve shared such a fun range of designs, my faves are the plum embossed card and the last ink blended background with the Folk Art stamp.
LikeLiked by 2 people
Great project shares. I like the purple card.
LikeLiked by 2 people
So many amazing cards!!! I really like the purple flowers in the marbled bloom set and the folk art cards. Thank you.
LikeLiked by 2 people
Great cards. I really like the linear crossroads die you used.
LikeLiked by 2 people
Gorgeous cards!
LikeLiked by 2 people