

Hello and happy Hero Arts release day!
We’re celebrating the new My monthly Hero card kit and add-ons release with a blog hop and a giveaway. If you arrived from Nichol Spohr’s blog, you’re right on track!
 This month’s theme is birthdays and I’ve got three cards to share.
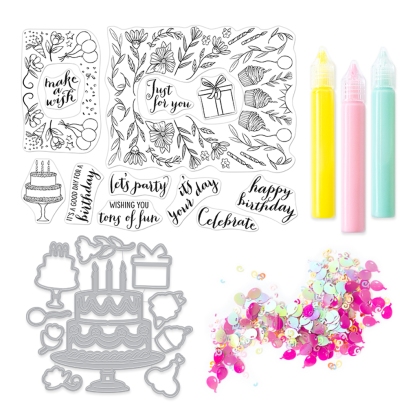
The first card uses elements from the card kit. I stamped the large floral background stamp and a sentiment from the kit onto an A2-sized piece of Neenah Solar White #80 Classic Crest cardstock. I had intended to do some no-line coloring so I stamped in a light tan color but as I got to coloring, I liked that the lines were still visible. So I kept my colors soft and light. I put down a quick layer of pink, yellow, and green (R21 , YR21, and G43, respectively). Then I used Prismacolor color pencils to add just a bit of shading and detail (Pink Madder Lake, Dark Chrome Yellow, and Earth Green Yellowish). I used the same colors for the layer cake (also from the set) and then die cut it out. For the candle flames, I used Cadmium Yellow and Orange Glaze, and to add a bit of shading to the sentiment, I used Terracotta. To assemble the card, I adhered the layer cake to the background with foam tape and then adhered the background to an A2-sized card base.
For my second card, I started with an A2-sized piece of Canson XL watercolor paper and four Karin Brushmarker Pro markers. I scribbled a few lines of Skin 2 at the top of the panel, and then a few lines of Gold, slightly overlapping. Using a round 8 watercolor brush and clean clear water, I brushed over the marker, smoothing out the color and blending them together. I pulled the Gold down the panel, letting it fade out a bit.
At the opposite end of the panel, I scribbled a line of Cyan and then a few lines of Cool Aqua. I blended them with the brush and pulled the Aqua up to meet the gold, being careful not to blend the two since I didn’t want to make green.
While the panel was drying, I used the large layer cake die cut from the card kit to die cut another piece of watercolor paper. I used the same pink and yellow markers to watercolor the cake. I also used Hero Arts Sparkle embossing powder to heat emboss the two white frosting embellishments. I wasn’t able to capture the sparkle in the photo, but in real life it’s just the right amount of shimmer!
To finish the card, I heat embossed the sentiment with white embossing powder, and then adhered the cake with foam tape before adhering the card front to an A2-sized card base.

My last card uses a couple of the add-on stamp sets: Party Fox Stamp & Cut and Decorate A Cake.
I started by stamping the fox from the Party Fox stamp set, and the cake from the Decorate A Cake set, in Copic-friendly Intense Black ink onto Neenah Solar White. I colored the fox with E00, E13, E15, and E17. Then I colored the cake, and the fox’s party hat and bow, in B41 and B45. I also added a bit of shading to the plate using W1 and W2 and then colored in the rim of the plate with a Sakura sparkle gel pen. I stamped the decoration on the bottom tier of the cake, and the sentiment, in the same black ink and then used the coordinating die set to cut out the cake and plate.
Next, I used an Exacto knife to cut an arc in the top layer of the cake and then slid one of the fox’s legs through the slit, as if he were jumping out of the cake. I taped the two pieces together on the back and then set it aside.
For the background I got out a piece of Strathmore Bristol Smooth cardstock and three colors of Hero Arts Reactive inks: Pool Party, Blue Raspberry, and Fiesta Teal (this last color is from the April 2018 card kit). I used foam blending tools to ink up the card, starting with the lightest color and then using the two darker colors to add shading around the edges of the panel. When I finished ink blending, I used a small round 2 paint brush to sprinkle clean clear water over the panel. I let the water drops sit for 15 seconds or so and then I dabbed them up with a clean paper towel. The result is a light-color splatter effect where the water reacted with the ink.
Next, I used the confetti stamp from the Party Fox stamp to add confetti to the background. To add shimmer to the confetti, I colored in the ribbons with the same Sakura glitter pen. Then, to finish the card, I adhered the fox and cake with foam tape and adhered the card front to an A2-sized card base.
Read on below, for information about the giveaway and for the entire blog hop list!

Giveaway
Hero Arts will give away one $50 gift card, drawn from the comments left across the blog hop. Enter by Sunday, February 9th at 11:59pm pacific, and the winner will be announced on the Hero Arts blog the following week.
Blog Hop List
Hero Arts
Amy Kolling
Caly Person
Channin Pelletier
Chari Moss
Daniel West
Debi Adams
Emily Midgett
Ilina Crouse
Janette Kausen
Jennifer McGuire
Laurie Willison
Libby Hickson
Lydia Fiedler
Maria Willis
Michelle Short
Nichol Spohr
Seeka <– You are here

such wonderful cards
LikeLiked by 1 person
Wonderful cards! Awesome coloring on each one, and the fox coming out of the cake is just adorable! Fun card!
LikeLiked by 1 person
Cute cards. Thanks for sharing
LikeLiked by 1 person
Your backgrounds are so perfect! I love your color choices!! What a fun kit! Definitely a set that can be used all year long. Thanks for the inspiration!!
LikeLiked by 1 person
The large floral background is so beautiful, I love the way you colored it in soft colors. The fox is so cute popping out of the cake!
LikeLiked by 1 person
These are so fun!! Specially love the cake card with that fabulous background!
LikeLiked by 1 person
Absolutely beautiful projects!
LikeLiked by 1 person
awesome
LikeLiked by 1 person
Beautiful cards! Love the fox jumping out of a cake.
LikeLiked by 1 person
Pretty and fun and love the colors.
LikeLiked by 1 person
Love your cards. Especially love the colors you chose for the first one and the fox coming out of the cake is inspired. Thanks for sharing!
LikeLiked by 1 person
Wonderful cards!
LikeLike
OK, Mr. Fox’s card is toooo funny! Great job! I think the 1st floral card is gorgeous. Such beautiful coloring!
LikeLiked by 1 person
I love your color combos!
LikeLiked by 1 person
What fun cards! Love the fox!
LikeLiked by 1 person
Such pretty cards! Nice colors on each one! That first card really catches my eye. So cute how you have the fox on the last card.
LikeLiked by 1 person
Great release!
LikeLiked by 1 person
Gorgeous cards
LikeLiked by 1 person
Super cards – especially love the first one! The water coloring is amazing! Thanks for sharing !
LikeLiked by 1 person
Hi Seeka 🙂 I love your gorgeous, stunning and delightful cards!!! Thanks for the inspiration 🙂
LikeLiked by 1 person