

Hi there, I hope you’re having a great day!
It’s a new month and that means there’s a new My Monthly Hero kit from Hero Arts. I’m tickled to be joining in the blog hop today to celebrate the new November release. If you arrived from Nichol Spohr’s blog, you’re right on track. If you want to start from the beginning, head on over to the Hero Arts blog! The entire hop list is at the bottom of this post, as is information about how to enter for a chance to win a $50 gift card to Hero Arts.

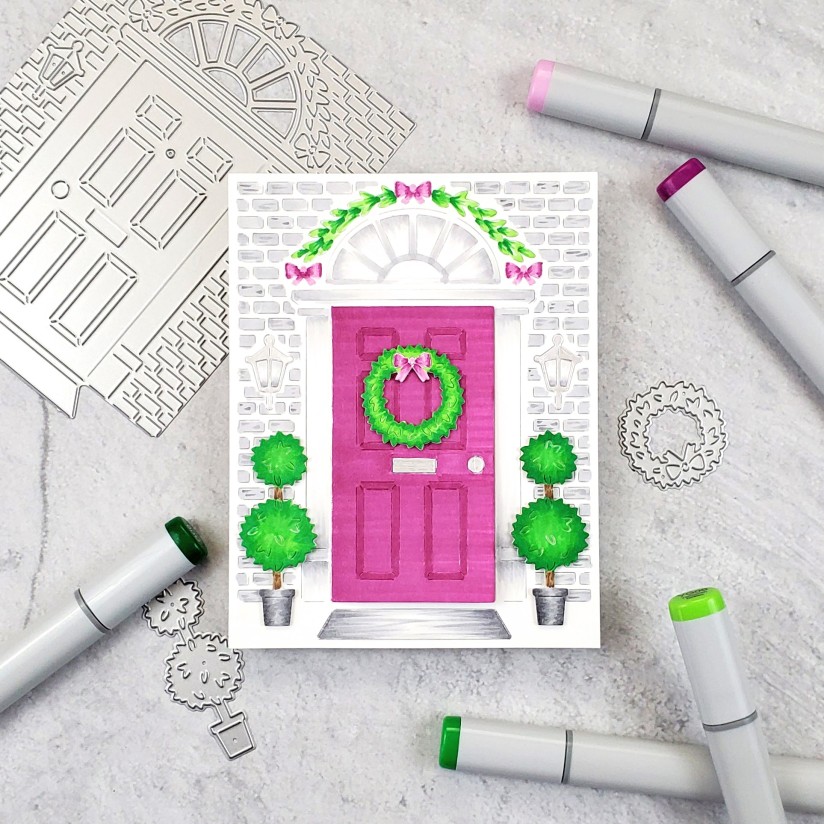
For my first card I used the Doorway Fancy Die to die cut an A2-sized piece of Neenah Solar White 80# Classic Crest cardstock. The die cuts a lot of detail into a panel but not all of the cuts create pieces that fall out. It’s a bit like having a cutting and embossing die in one!
After I die cut the panel, I added some Scotch tape behind the pieces that would have fallen out, like the window panes, to keep them in place. Then I got down to coloring. I was inspired by the front door of a friend’s house which is a beautiful dark magenta. My door is a bit brighter, but I went with it 🙂
I colored the door with RV66, leaving the texture of the marker lines in tact (which I don’t think I would do again). I added another layer of color over the outline of the panels so that they would be a bit darker. For the bows I used a combination of RV63 and RV66.
For the garland I used YG06, YG09, and G09. I used the same three colors for the wreath and the topiaries, which I die cut separately (they each consist of four die cut pieces layered and adhered together for dimension).
For the rest of the panel, I used a collection of grays: N1, N2, N3, and N4. I took my time coloring each of the bricks and adding random texture with short flicks of the darker grays. I added subtle shading to the window panes and pillars, and darker shading for the doormat and the topiary pots. For the light fixtures, mail slot, and door handle, I used a silver Uniball gel pen, to mimic metal.
Separately, I colored the Christmas tree from the stamp set in the same three greens. I used Y08 for the star and a combination of silver and gold Unibal gel pens for the ornaments. I used the coordinating die cut to cut it out.
With the coloring done, I adhered the wreath and the topiaries to the card front and then added foam tape to the back, taking care not to add adhesive behind the door so that it could swing open. I adhered the card front to an another A2-sized piece of Neenah and then adhered the Christmas tree inside the door, also with foam tape.
For the sentiment, I used a black pigment ink and clear Hero Arts embossing powder to heat emboss a sentiment from the kit onto a piece of vellum. Then I adhered the vellum inside the door, over the bottom of the tree, using a Zig 2-way glue pen.
To finish, I adhered the piece to the front of an A2-sized card base.

For my second card, a quick and easy one, I used the same three greens to color another Christmas tree. This time I colored the ornaments with B01, B02, and B04. Then I die cut it out and set it aside to work on the background.
I used painter’s tape to tape down a piece of Canson XL watercolor paper to my work surface. I wet down the paper with clean clear water and then added Cerulean Blue Mission Mijello Gold watercolor, using a flat brush to paint the panel with an even wash of blue. I used my heat gun to help the speeding process and then added another layer of blue. After drying the panel again, I added a third layer of color, this time Cobalt Blue No. 1 which is a bit darker. I added it to the top of the panel and then blended it into the lighter blue. The end result is just the slightest of color variation in the panel, which may or may not have been worth the effort ;p
I added some splatters of white gouache and then cut the panel down to slightly smaller than A2-size.
I cut a gentle curve into a piece of Neenah to create a white snowy hill, onto which I stamped a sentiment from the kit. I backed the hill and the tree with foam tape and adhered both to the watercolored piece. Then I used foam tape to adhere the watercolored piece to an A2-sized card base to finish.
Thank you so much for visiting! Your next stop is the amazing Yana Smakula. Giveaway details and the full blog hop list are below.

Giveaway
Hero Arts will give away one $50 gift card, drawn from the comments left across the stops on the blog hop. Enter by Sunday, November 10th at 11:59pm pacific, and the winner will be announced on the Hero Arts blog the following week.
Blog Hop List
The Hero Arts Blog
Amy Kolling
Caly Person
Channin Pelletier
Daniel West
Debi Adams
Emily Midgett
Ilina Crouse
Jessica Frost-Ballas
Julee Tilman
Laurie Willison
Lydia Fiedler
Maria Willis
Mariana Grigsby
Nichol Spohr
Seeka <– You are here
Yana Smakula

Great cards. Love the tree in the snow
scene. thanks for sharing
txmlhl(at)yahoo(dot)com
LikeLike
Very pretty. The pink worked. Hmmm. Tree front and center was always my mom’s thought too. This kit is so packed with great memories, and great card ideas. Thanks
LikeLike
So cute with a pink door and blue ornaments on the tree.
LikeLiked by 1 person
Love these cards! The use of bright colors just really males them unique. Love that pink door!
LikeLike
Gorgeous cards! I love the pink and green color combination at the doorway- so pretty!
LikeLiked by 1 person
Love the clean, bold, bright colors!
LikeLike
So beautiful! I absolutely love the colour of the door on the first card!
LikeLiked by 1 person
Your cards are so pretty! I really love the bright colors. Thanks for the inspiration.
LikeLike
Very nice cards! The door scene has such interesting colors and that gray with it looks so nice.
LikeLike